...
When exiting data records (accessed through the Master > File Maintenance options) several factors determine whether or not a prompt to save the record will appear.
When exiting a record and no changes have been made in the data record, you will not be prompted.
When exiting a record and one or more changes have been made:
Choosing File > Save/Exit from the menu or clicking on the


icon automatically saves and exits the data record without prompting to save. Be sure you intend to save the changes when selecting this option!
Selecting File > Next Record from the menu, clicking on the


icon, pressing the Esc key, or clicking on the X button in the upper right-hand corner of the window brings up a prompt similar to the one shown above.
| Anchor | ||||
|---|---|---|---|---|
|
| Anchor | ||||
|---|---|---|---|---|
|
| Anchor | ||||
|---|---|---|---|---|
|
| Anchor | ||||
|---|---|---|---|---|
|
...
Lookup List Features
Data Display
Data records are displayed in columnar format.
Columns can be sized as needed. Rest the pointer on the right side of the heading boundary for the column to resize. When the pointer changes to


, drag the boundary to the desired column width.
Hide/show specific columns of information. Right-click in the list area and use the checkboxes to select fields you would like to be visible.
Resize or maximize the lookup list window as needed to display the data.
Data Sort
Double-click the column header to change the primary sort order.
Double-clicking on the primary sort column header toggles the sort order from ascending to descending. Multiple item sort can be achieved by sorting on the first column, then clicking on the header of a second column.
Printing and Exporting List
Once the list is sorted and displayed to your preference, click the PRINT button on the toolbar to print out the list as it is displayed on the screen.
Once the list is sorted and displayed to your preference, click the EXPORT button on the toolbar to export the list to a file as it is displayed on the screen. You will be prompted for the location and file name you wish to save it as. The text file created can easily be imported and manipulated in other software applications such as Microsoft Excel.
Save List Format
Choose Save Grid Settings from the menu or toolbar to save and display the preferred sort method and column sizing each time a particular lookup list is accessed. This feature is user-specific so everyone can set his/her own preferences (user-specific meaning the System Security feature is in use and each user has his/her own login ID).
| Wiki Markup |
|---|
*NOTE:* _Occasionally, the user-specified sort will be overridden when options that sort in a particular method are selected. For example, for the parts lookup list, if the user-specified sort is set to display by part description (Name), the lookup list will display in description order in most instances. However, if the parts lookup list is accessed while you're in the *Create \[Part\] Tags by Bin* option, the preferred sort method will be overridden and the lookup list will be displayed in bin order instead._ |
...
Two types of lookup lists are available: Standard and Advanced. Their functionality and appearance are similar but a few distinct differences exist between the two (see the table below). Both types of lookup lists can be used at anytime throughout the RTA system. To toggle from one format to another simply change the View setting in the lookup list.
Feature | Standard Lookup List | Advanced Lookup List |
Navigating through data records | Click on the Line Up, Line Down, Page Up, Page Down, Top of File, and End of File buttons | Drag the scroll bar |
Loading and displaying data records in lookup list | Loads only the displayed records into memory so data records are displayed instantly | Loads the entire data file into memory before any records are displayed onscreen. Large data files such as parts, POs, WOs, and fuel transactions will take longer to process. (see TIP below) |
Search for specific data | Basic search capabilities in the primary sort field | Advanced search capabilities including searches for a string of text in various fields |
TIP: When using the Advanced lookup list, if you know that the needed record is towards the starting or middle of the data file, you can hit the ESC key while the data file is loading to stop the process. All records processed before hitting ESC will appear in the lookup list. *Incomplete Listing* displays under the toolbar indicating that the entire file was not loaded.
...
Data Search: Standard Lookup List
...
Data searches available to locate matching records in the primary sort field. For example, to search for a particular vendor by Vendor Name, change the primary sort order to sort by Name if it isn't already the primary sort (double-click the Name column header) and then type in the vendor name for the search. The Find window pops up automatically as soon as text is typed; however, if you prefer to bring up the Find window before typing, press F4.
The search is based on the starting characters. Staying with the vendor search by Name example, if the letter C is typed in, the lookup list brings up vendor names starting with the letter C; if CH is typed in, vendor names starting with CH are brought up. Type as many character as needed until the desired record is located. If an exact match is not found, the record closest to the entry is brought up.
Leading zeroes must be keyed in. For example, to search for vendor number 111, make Number the primary sort and then type 0000000111 in the Find window. (The vendor field is a 10-digit field so seven leading zeroes are needed in this case.) In the work order lookup list, to search for work order number 5337, make Number the primary sort and then type 0005337. (The work order number is a 7-digit field so three leading zeroes are needed.)
If a facility number appears in the lookup column, the facility number also needs to be input in the search criteria. For example, in the work order lookup list, the vehicle and customer numbers are listed with the facility number; therefore, when searching for a vehicle or customer, the facility number needs to be input as well.
Data Search: Advanced Lookup List
...
The Advanced lookup list has many data search features that will locate just about any record! Type in the text string to search for and then select the desired search options.
Current column only: Select to search only in the column where the cursor is currently positioned; deselect to search all columns in the lookup list for matching text.
Match case: Select to find exact upper/lowercase match; deselect to find all occurrences.
Direction: Select the Up or Down radio button to indicate the direction of the search.
Limit search to: Select Any to find all occurrences of the text string—this finds text starting with, ending with, or containing the specified text; select Leading text to find records that start with the specified text string; select Exact match to find records that match the text string exactly.
Leave search window up while navigating lookup list & return to find window.
| Anchor | ||||
|---|---|---|---|---|
|
| Anchor | ||||
|---|---|---|---|---|
|
| Anchor | ||||
|---|---|---|---|---|
|
| Anchor | ||||
|---|---|---|---|---|
|
| Anchor | ||||
|---|---|---|---|---|
|
...
The calendar option is available in many areas of the software where you're prompted for a date. To use the calendar, either choose Calendar or press the F1 key (this varies depending on the screen you're in).
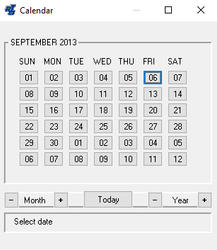
The current system date is the default. Click the Month - or buttons to move back or ahead a month, click the Year - or buttons to move back or ahead a year, then click on a day to select the desired date.
...
NOTE: The use of the Advanced Report Viewer feature requires special installation and setup procedures. The "Client.exe" needs to be installed on each workstation that will be using this feature. This can be located within the fleet folder. There is a client folder there where it is stored
The advanced Report Viewer must be enabled, otherwise the standard report viewer will be used. Enable this option by setting option #12 to 'Advanced' in System > Setup System Switches > Main System Parameters (SSM).
Many, but not all, of the RTA reports allow the option of viewing the report to the screen using the advanced viewer. When the View/Print option is selected, a window similar to the following appears:

Due to the graphical nature of this report format, it may incur a higher 'cost' when running in thin client network configurations such as Terminal Services or Citrix environments. We suggest that you fully test the load on your servers prior to implementing the enhanced format on your network to make sure that your servers are capable of maintaining an acceptable service level while allowing users to create these advanced format reports.
...
To print the displayed report, click on the Print icon in the toolbar.
...
...
Saving the Displayed Report
...
To save the displayed report, click on the Save This Report icon in the toolbar. We recommend saving all reports in the Reports folder in the fleet subdirectory so they can easily be located later.
When prompted, enter the file name for the report and then choose Save. Saved RTA reports have an extension of .rpv and can be retrieved by selecting *Reports > Accessed Saved Reports from the RTA main menu. Refer to "Accessing Saved Reports" later in this chapter for more information.
...
Additional features are available by clicking the appropriate icons in the toolbar. These features include text searches, highlighting text, checkmarks, adding text notes.
Also, your company logo may be substituted by replacing the report.bmp file with your own logo with a 600x300 pixel size.
Accessing Saved Reports
Select Reports > Access Saved Reports from the RTA main menu. (RD)
Type in the file name or select the name of the saved report you wish to access
Select the file type, either "RTA Standard Reports" or "RTA Advanced Reports" depending on the type of report you wish to recall.
Click OPEN.
The report will be displayed in the Report Viewer window.