| Wiki Markup |
|---|
*NOTE:* _Since the vehicle file can be used to track more than just vehicles (forklifts, mowers, buildings, building equipment, etc.), the term "unit" in this section refers to vehicles, equipment, buildings, and other items that have been set up through the *\[Vehicle\] File Maintenance* option (MVM)._
It is possible to link one vehicle (or unit) to another vehicle (or unit) in the RTA system. For example, a truck can be linked to a compressor or generator—a bus can be linked to a wheelchair lift or fare box—a building can be linked to an A/C unit. It is also possible to link multiple vehicles (or units) to one another—a tractor can be linked to a trailer to a lift gate, and so on.
Linking units to one another allows them to be grouped together on certain reports, which makes it easy to identify all associated costs, activity, history, etc. for the linked units. For example, the *Print PMs by Vehicle Link* report groups linked units together on the PM due report (VK). This makes it is easy to determine, at a quick glance, which PMs are needed and if they can be completed together rather than having to bring the vehicle in multiple times. |
| Anchor |
|---|
| _Toc151867316 |
|---|
| _Toc151867316 |
|---|
|
| Anchor |
|---|
| _Toc200860488 |
|---|
| _Toc200860488 |
|---|
|
| Anchor |
|---|
| _Toc237141035 |
|---|
| _Toc237141035 |
|---|
|
| Anchor |
|---|
| _Toc487791963 |
|---|
| _Toc487791963 |
|---|
|
Adding a Link Through the Vehicle Record- Bring up a vehicle (unit) record (MVM) and then select Utilities > Link Vehicles from the menu or click on the Link Vehicle icon in the toolbar.
- The selected unit number displays in the Edit Vehicle Links window. With the mouse pointer anywhere in the window, click the right mouse button and then choose Add Link from the menu.
- By default, the selected unit number is automatically assigned as the parent. Enter the unit number to link or press F1 to select a unit from the lookup list. If the specified unit is already linked to another unit, an error message appears and prompts for another number.
- Enter up to 60 characters to describe the link between parent and child or miscellaneous notes.
- Choose OK to link the child unit to the parent.
- Repeat steps 3 – 5 to link additional units to the parent and then choose Cancel to return to the Edit Vehicle Links window.
 Image Removed
 Image Added
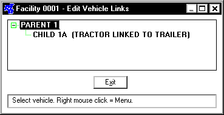
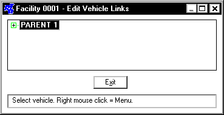
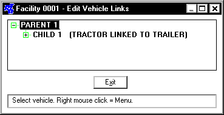
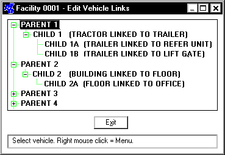
At this point, the parent is shown with a  symbol to indicate at least one link exists. To expand the list and see the link(s), click once on the symbol or double-click on the parent unit number.
To link a unit to the child, place the mouse pointer on the child unit number and then complete steps 2 – 6.
Image Removed Image Added The symbol indicates the child is also a level 2 parent; click to expand 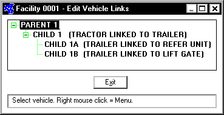
| Anchor |
|---|
| _Toc151867317 |
|---|
| _Toc151867317 |
|---|
|
| Anchor |
|---|
| _Toc200860489 |
|---|
| _Toc200860489 |
|---|
|
| Anchor |
|---|
| _Toc237141036 |
|---|
| _Toc237141036 |
|---|
|
| Anchor |
|---|
| _Toc487791964 |
|---|
| _Toc487791964 |
|---|
|
Adding a Link Using the Unit Link ProgramThis option allows links for multiple vehicles to be added without having to bring up individual vehicle records. This method also allows the ability to see link relationships for all the vehicles in your fleet.
...
- Enter the unit number to link or press F1 to select a unit from the lookup list. If the specified unit is already linked to another unit, an error message appears and prompts for another number.
 Enter up to 60 characters to describe the link between parent and child or miscellaneous notes.
- Choose OK to link the child unit to the parent.
- Repeat steps 3 – 5 to link additional units as needed and then choose Cancel to return to the Edit Vehicle Links window.
- Repeat steps 2 – 6 until all units have been linked.
| Anchor |
|---|
| _Toc151867318 |
|---|
| _Toc151867318 |
|---|
|
| Anchor |
|---|
| _Toc200860490 |
|---|
| _Toc200860490 |
|---|
|
| Anchor |
|---|
| _Toc237141037 |
|---|
| _Toc237141037 |
|---|
|
| Anchor |
|---|
| _Toc487791965 |
|---|
| _Toc487791965 |
|---|
|
Unlinking a VehicleTo unlink a vehicle, do the following:
...