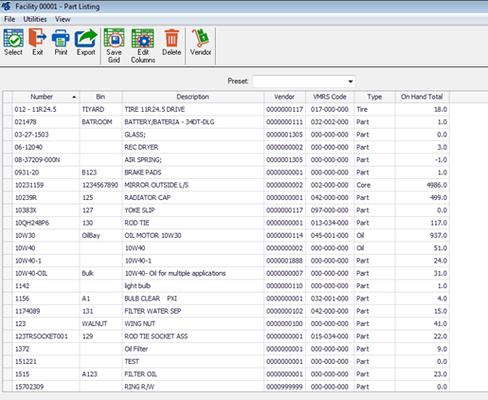
This new F1 lookup feature, for SQL systems only, has many added benefits over the regular F1 lookup. Some of these benefits are : faster record load times, add, delete and re-order columns, sorting on multiple columns at one time, filtering data and printing and new export options. These F1 queries can be saved as individual presets.
To use this feature, the SetupNetControls application needs to run on each workstation that will be using this feature. This is found in the Client folder located within the Fleet folder on your server. In addition, Main System Parameter switch #47 must be set to On. Go to System > Setup System Switches > Main System Parameters (SSM), Switch #47.
Sorting - You can sort by a single column or multiple columns. To sort by a single column, a single click on the column header will toggle between ascending, descending. You can also right click on the column header and select the preferred order. To sort by multiple columns, first, click on the header of the primary column. Additional columns are sorted by holding down the SHIFT key and clicking on the header of another column.
Reordering columns - You can reorder columns in different ways: by clicking the toolbar button “Edit Columns”, using drag and drop and right-clicking the column header and choosing “Hide This Column” and “Column Chooser”.
...
To remove a column, right-click the column header and select “Hide This Column”. You can also hold down the left mouse button and drag the column off the screen.
The Edit Columns toolbar button and the Column Chooser from the right-click menu, do the same thing. They open a small window which displays all available columns that are hidden from the grid. To show a column, drag if from the small window to the desired position in the grid or double click it and it will move to the last column. To hide a column currently displayed in the grid, drag the column header back to the small window.

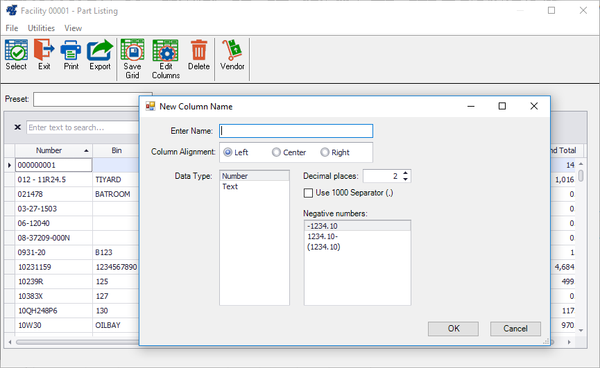
Custom column and Expression editing - You can now create “Custom Columns” with Expression editing on these custom columns. This could include any string manipulation (i.e. add the letter A to the vehicle number for display purposes) , or can do math, both date, and straight number math. This is done by right-clicking the header and selecting “Add Custom Column. It will then prompt you what data type the column will end up becoming. You will need to specify what the end use will be, a string or a number. After adding the column and specifying a name, the column will appear in your list. Right-clicking the new column will now give you the option of “Expression Editor”. Inside of the expression editor is how you do your manipulation and it has built-in documentation for different functions that are available. In some cases, when doing math decimals will not come across. In order to achieve this, you must add a decimal to the expression(i.e. 5 / 2 will yield 2, but 5 / 2.0 will yield the desired 2.5).
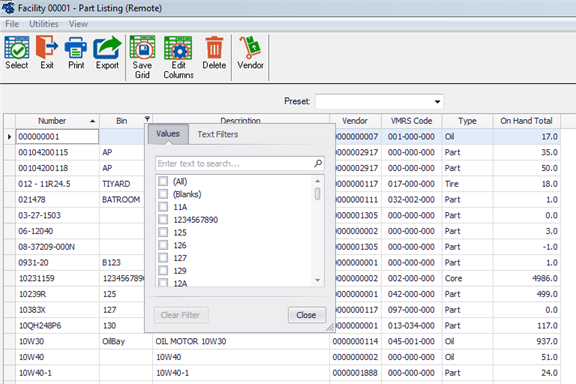
Column filtering – By hovering the cursor on a column header, a small filter icon will appear. This is the Filter button. Click on that button and a small window opens which allows the user to select options for filtering. The options are dependent on the data type of the column. On the Values tab, there are checkboxes next to the data items of the column and the user can check or uncheck any items, depending on the filter preferences. The second tab, Text Filters, Numeric Filters, will display additional filter options.
There is also a custom Filter Editor available by right-clicking on a column header and choosing Filter Editor. A user can write a custom equation to calculate the values of that column.
Filtering can be done on multiple columns by selecting filter options on multiple columns. It is preferable to set the filter option on the columns in the order a user would to see the data filtered.
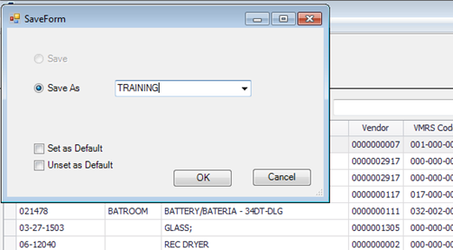
Saving and Presets – A preset allows a user to format a lookup with preferred columns, order, sorting, filtering and other data that will allow the layout to be saved and restored.
...
Each user can save their preferred preset layouts for each menu path that uses a particular lookup. When a user selects “Set as Default” on the Save screen, the saved preset will be loaded as the default when the lookup opens. You can click “Unset as Default”, which will retain the preset, but it will no longer load as the default layout.
Delete – This button applies to presets. If the preset you delete is the default for the menu path, it is deleted from the database, and the lookup will load the RTA default layout on the next use. If it is not the default preset, it will just be deleted from the database.
...
Export – The lookup data can be exported into 5 formats: Text (tab delimited), CSV (comma delimited), MS Excel, MS Word, and PDF. Column headers are exported. The exported data is the set of visible columns. Large grids might not show all columns on a single screen.
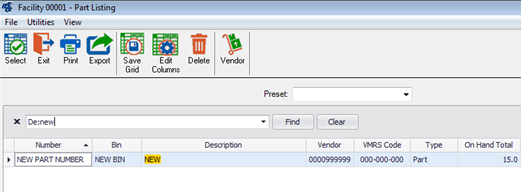
Search – Searching can be done by right-clicking a column header and clicking “Show Find Panel”. This will open a search panel above the grid, which will stay visible. It can be hidden by right-clicking on the column header and selecting “Hide Find Panel” or by clicking the X on the search panel. The shortcut is CTRL + F.
...
The search panel can be cleared by clicking the Clear button.
Resize – There is no button to resize the lookup window. You resize by clicking and dragging a corner or edge of the lookup window. Be careful when resizing to small, visibility of some screen components such as toolbar buttons and the reset dropdown may be affected. You may also resize by clicking the Maximize icon on the upper right of the lookup window. Minimize is not supported at this time, and the icon is grayed out.