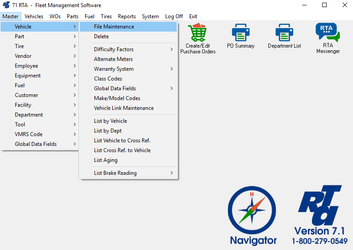
- Select Master > Vehicle > File Maintenance (MVM) from the RTA main menu.
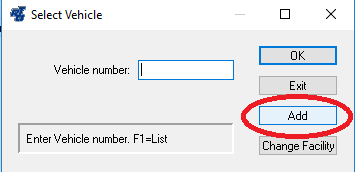
 - Enter a vehicle number and select “Add”. The vehicle number is a text field allowing up to eight characters
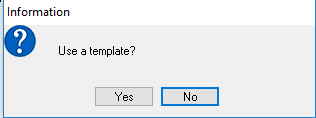
 - Specify if you would like to use a template. (Most information from the template vehicle will be copied to the vehicle being added. Only the inherently unique information is omitted, such as: VIN, License, Odometer, Operator, etc.)
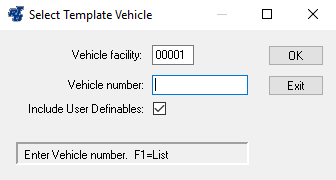
- If you use a template, you will be prompted for the Vehicle Number you wish to use for the template. You may enter the Vehicle Number, or press ”F1” to select from the lookup list of your existing vehicles in the RTA system. Leaving the “Include User Definable” box checked will also copy the data from the “User Defined” tab of the template vehicle. Uncheck the box if you wish to use the default field descriptions in the “User Defined” tab for the vehicle being added.
- Enter the Year, Make, Model, Serial Number (VIN), License Plate, Class Code, Department, and Customer in the upper section. When the cursor is in any of these fields, a “Help Line” is displayed at the lower left corner of the window, prompting you for information and advising if a list is available using the “F1” key on your keyboard.
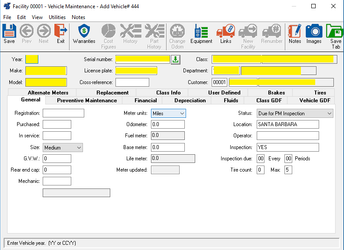 In the lower section, there are Tabs with labels in bold font. Only a few areas within these tabs are “required”. Below are descriptions of the fields. ****Click to see a description of each tab. | Expand |
|---|
| 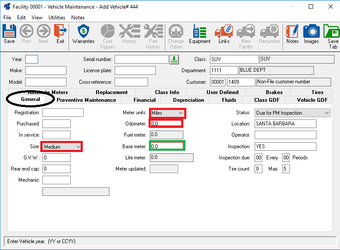
- Size (Required)
Select the appropriate Size by using the drop down arrow and selecting from the available lists.
- Meter Units (Required)
Select the appropriate Meter type by using the drop down arrow and selecting from the available lists.
- Odometer (Required)
Enter the Vehicle’s odometer reading in the Odometer field. This will bring up a prompt asking if you wish to post the odometer reading to “Lifetime” or “Current Period”. Select “Lifetime”.
****NOTE: The Odometer field cannot be edited in this screen after the vehicle record is saved. It is best to enter this information when first adding the vehicle.
- Fuel Meter
The Fuel meter is automatically updated by the RTA system. No entry can be made to this field.
- Base Meter (Recommended)
The number entered here will be subtracted from the “Life meter” before the cost per mile is computed on the vehicle cost per mile reports. If no costs or history is being entered into the RTA system, enter the “Odometer” reading into the “Base meter” field as well. If history is being entered, the “Base meter” should be edited to reflect the meter reading from the earliest documented repair costs in RTA.
- Life Meter
The Life meter is automatically updated by the RTA system. No entry can be made to this field.
|
| Expand |
|---|
| 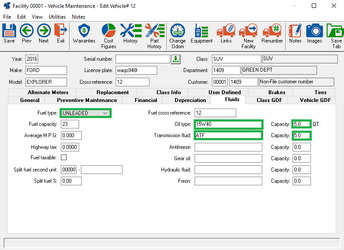
- Fuel Type (Recommended)
Select the appropriate Fuel type by using the drop down arrow, and selecting from the available lists.
- Fuel Capacity
Enter the vehicle’s total fuel tank capacity in gallons or liters.
- Average MPG
Enter an estimate of the vehicle’s fuel economy. The label indicates miles per gallon; however, enter the estimate figures for Liters per 100 Kilometers, Gallons per hour, Kilometer per Liter, or whatever type of cost reporting your fleet uses for measuring fuel economy.
- Highway Tax
Enter the highway use tax rate for this vehicle
- Fuel Taxable
RTA can track fuel taxes, when fuel tickets are entered in the system. The box is checked by default. Uncheck this box to not track fuel taxes for this vehicle.
- Split fuel with second unit
Allows two vehicles to share fuel costs, such as when a reefer unit is pulling fuel from a tractor’s fuel tank.
- Fuel Cross-Referance
This field is used with the Electronic Fuel Interface add-on option.
- Oil type and Capacity (Recommended)
Enter the oil part number and capacity used by this vehicle. The Part number entered here can be automatically posted when posting through the Quick Fuel Entry option (FFQ or 212).
- Transmission Fluid and Capacity (Recommended)
Enter the transmission fluid part number and capacity used by this vehicle. The Part number entered here can be automatically posted when posting through the Quick Fuel Entry option (FFQ or 212).
- Antifreeze and Capacity
Enter the antifreeze part number and capacity used by this vehicle.
- Gear Oil and Capacity
Enter the gear oil part number and capacity used by this vehicle.
- Hydraulic Fluid and Capacity
Enter the hydraulic fluid part number and capacity used by this vehicle.
- Freon and Capacity
Enter the refrigerant part number and capacity used by this vehicle.
|
| Expand |
|---|
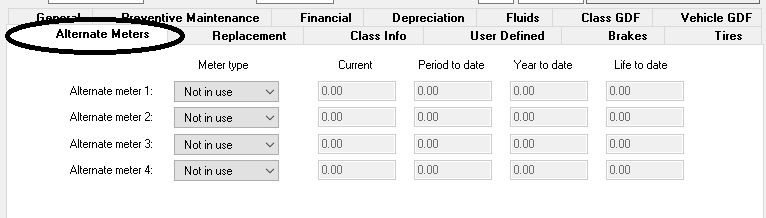
| title | Alternate Meters Tab |
|---|
| In addition to the Odometer entry in the General Tab, up to four alternate meters may be used per vehicle.
 |
| Expand |
|---|
| An optional vehicle replacement schedule may be defined individually, or for a class of vehicle.
 |
| Expand |
|---|
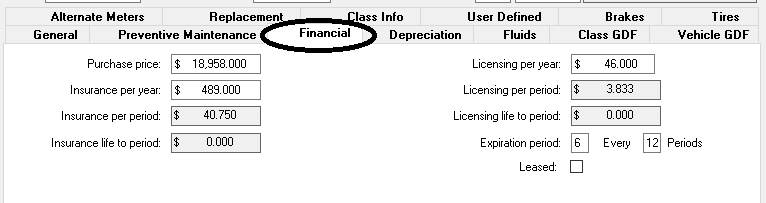
| Purchase, license and insurance costs may be entered here. Costs are incorporated in the fixed costs reports.
 |
| Expand |
|---|
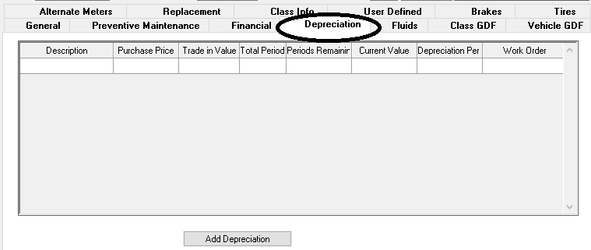
| A straight line depreciation option may be entered here.
 |
| Expand |
|---|
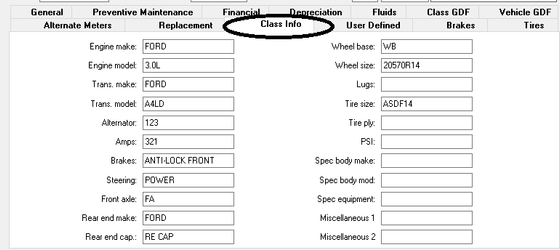
| The fields tracked within this tab are defined by the classification to which you assigned the vehicle. These fields can be customized by editing the Class Code. (See how to add vehicle class codes)
 |
| Expand |
|---|
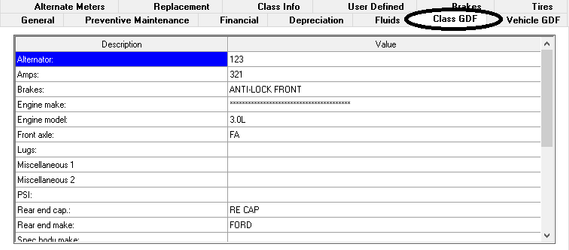
| Class Global Defined Fields are available for additional fields of information specific to the vehicle’s Class Code.
 |
| Expand |
|---|
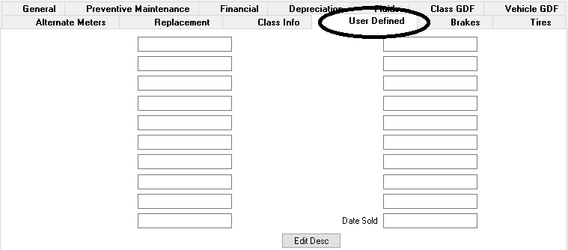
| All of the fields in this window are for notational purposes only and are not used by the RTA system. Both the field descriptions and the values may be edited directly from this window. It is commonly used as a reference to list frequently used Part numbers.
 |
| Expand |
|---|
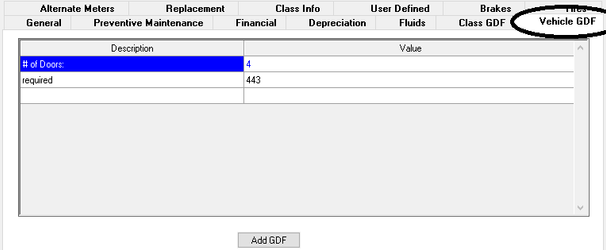
| Vehicle Global Defined Fields are available for additional fields of information for this specific vehicle
 |
| Expand |
|---|
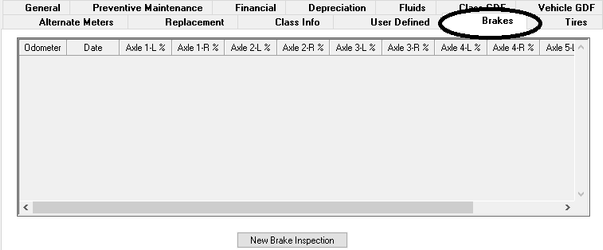
| Brake lining measurements may be entered here. This option is also available on each work order, with the information being stored on this tab for quick reference.
 |
| Expand |
|---|
| title | Preventive Maintenance Tab |
|---|
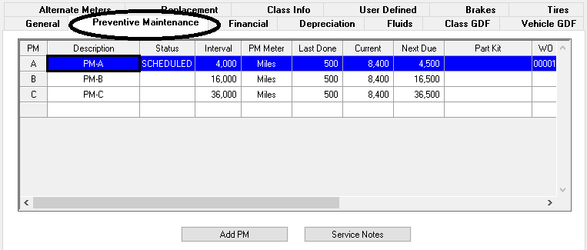
| PM schedules may be added, updated and reviewed here.
 |
- Save the Record
|