The Paperless Shop tool on our mobile app allows you to:
...
More features will come in future iterations. As they do, they will be added to this document. Here is what is included:
| Table of Contents |
|---|
| Warning |
|---|
IMPORTANTBefore you get started, you need to configure the time zone for the mechanics. This is done by going in to RTA, going to the drop down Master > Facility > File Maintenance and then specifying the zip code for that facility. If there is no zip code, it will use UTC time zone. |
Clocking in to Paperless Shop
Once you are logged into the RTA Mobile App. Click on the following link to see information on Logging in to RTA Mobile.
...
Once you are linked to an employee you will then see the following main screen to clock in.
Select “Start Shift.”
...
Main Paperless Login Screen
From the main Paperless Shop Clock in screen you can:
End your shift (clock off)
Start your lunch break
Toggle between the Incomplete and Assigned Jobs lists
Review and/or update job line notes
View all incomplete Jobs under one list
...
Paperless Shop Menu Icons:
...
In addition there are permanent Paperless Shop Menu Icons at the bottom of the paperless navigation screens.
...
Home
Search
Add Job
Indirect (Jobs): Brings up the list of Indirect Jobs to choose from when you are still working in the shop but not on any given vehicle
Activity (Shop): See who is currently logged in to Paperless Shop and what they are logged in to
Home:
...
This Menu option take you back to the Main Paperless Clock in screen as seen below.
...
Search:
...
This Menu option allows searching the Work Order Jobs List, both assigned and un-assigned work.
...
Default Job Search Screen:
...
You can type in a general search in the top Search line a “Key” Word or Letters to narrow down the Jobs:
...
Or Look for Jobs that contain “PM” in the Job Title
...
Advanced Search:
Also by selecting the Option Button shown below
...
| Info |
|---|
Note: The color that shows up on the left side of the job panel represents:
|
Adding Jobs:
...
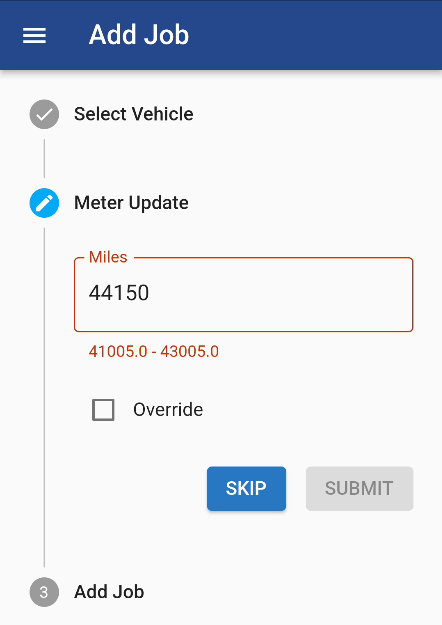
If you decide to add a job, select the Add Job menu item then you will be prompted for three step by step sections:
Select Vehicle
Meter Update
Add Job
Select Vehicle:
...
By selecting the Right chevron button:
...
Scan the Vehicle’s Vin Barcode to select a vehicle. See the section on Scan VIN Barcode
...
Meter Update:
Once you have your Vehicle, enter in the meter reading. This goes off of your max mileage switch in RTA so it gives you a range of an acceptable meter. If you go above that, you can select to override that meter.
You can't submit a higher meter unless you check the override box.
Add Job:
...
Then you can choose your VMRS job code.
...
Once you have selected a job code, you can select if this is for an existing work order or a new work order and choose the vehicle status, repair type and cause code. You can then choose if you want it to be assigned to yourself or not. If you assign it to yourself, you can click 'Add Job & Start' to clock on to the job immediately. Otherwise, you can just add the job to work on it later.
...
Indirect (Jobs):
...
The Indirect Jobs Menu Item brings up the list of Indirect Jobs to choose from when you are still working in the shop but not on any given vehicle
...
Activity (Shop):
...
This Menu Item will bring up who is currently logged in to Paperless Shop and what they are logged in to.
...
Clocking on to Jobs
From the main screen of mobile Paperless Shop, you can clock directly into:
...
If you have an inspection assigned to that line, it will also show up. For more info, please see Mobile Paperless Inspections. From this screen, you can also add a new job for that vehicle. So if the mechanic notices another issue with that vehicle, they can easily create a new work order line for that same vehicle.
...
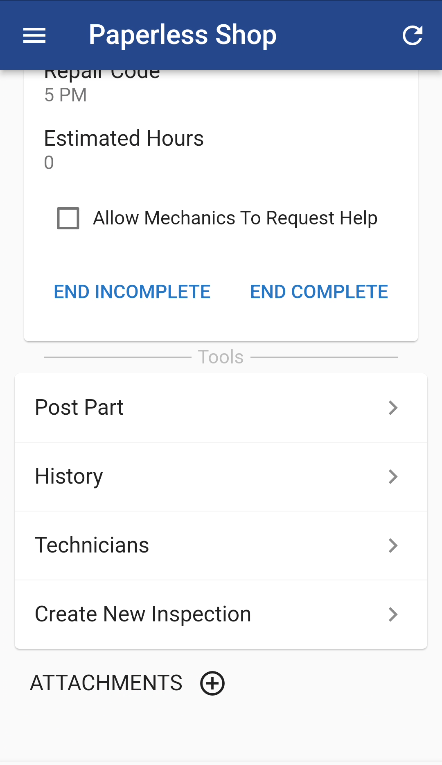
Tools Section:
In the Main screen when clocked into a Direct Work Order Job towards the bottom of the screen there is a Tools Section
...
Post Parts
History
Technicians
Create New Inspection (See Mobile Paperless Inspections)
Add Job
Brake Inspection (Only available if setup in RTA Classic)
Tire Inspection (Only available if setup in RTA Classic)
Notes
...
Post Parts:
If you select post parts, it will take you to the transactions. You can view already posted transactions, and if you click on the '+' symbol in the bottom right, you can put in new parts to post.
...
Posting On File/Inventory Parts:
You can either enter in the part number by using the Search Button and typing in the Part Number or Description
...
When you pull up a part, it will show you how many you have on hand. Then type the Quantity to Post, and if you want to create a warranty claim for it. If you have enough on hand, you can select the Post Part Button.
...
Part Kits:
If you have a part kit assigned to the line, a blue button will be displayed. If the button is gray, you don't have sufficient quantity to post that part kit.
...
You can also search for part kits if there isn't one assigned. Part kits that don't have sufficient quantity will show a warning icon. Part kits that are available to post will have a box icon.
...
Posting Non-File/Non-Inventory Parts:
Or if you type a Part Number that does not exist in the Parts List you can post it as a “Non-Inventory Part Number”.
...
The Part Description
Quantity to Post
Unit Cost/Price
...
History:
One can review previous work done on the vehicle you are currently logged in to
...
History Search Options:
...
Search By:
Facility work was done in
Work Order Number
Open, Partial and/or Closed work
VNRS Job Code
Priority Code
Reason Code
...
Technicians:
If you have the Allow Mechanics To Request Help turned on at the Job level the “Assign New Technician” can be used to onboard a secondary technician to help with the current job and you can assign the additional Techs “On The Fly”.
...
Then you choose to close the work order line or not and if you have permissions you may be prompted to close the work order. When you clock off a job, it will take you back to the jobs screen.
Lunch:
If you clock off for lunch, you will get the screen below.
...
In order to clock back in from lunch, you simply need to Clock in to another Direct or Indirect job. Once you are Clocked in you are now off of Lunch.
End Shift:
When are done with your shift, you can simply hit "End Shift."
...