In RTA, there are a couple of utilities that allow you to export data into excel, edit and add to the data, and then import back in to the database. This guide will go over the steps to do that using the parts export/import as an example. Many reports are also exportable and you can use this guide to walk you through how to do that as well.
Step by Step guide
There are three utilities that can export into excel and then import back into RTA. They are vehicle, parts and VMRS export/imports. Here is the how to using the parts but it works the same for the others.
- Go to the file path System > Utilities > Parts > Export/Import and enter in the level 3 password.

- Make sure that "Export" is selected, choose your parameters, and then put in your file location. After verifying the location, hit "OK." This will save as a txt file.

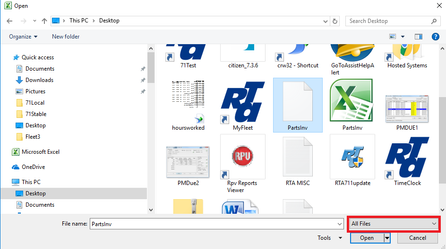
- Once you have saved the file, open up a blank excel document. Go to File > Open and search for where you saved the document. You will need to switch the file type from excel files to all files in the bottom right of this window so that you can locate the file. Select the file and hit "Open."
- The following message will be displayed:

Select "Yes." and a text Import Wizard will show up. - By default, you should be able to click 'Next' through Steps 1 & 2, but just to confirm, Step 1 should be set to "Delimited". Click Next.

- Step 2 should be set to "Tab". Click "Next."

- In Step 3 of the Import Wizard, there is a 'Data preview' pane shown at the bottom. Drag the scroll bar at the bottom of this display all the way to the right. In the very last column, hold down the shift key and click your mouse at the top of the last column. This should select or highlight all columns in black. Finally, change or select "Text" for the column data format. This will change all of the column headers to Text. Then click "Finish."

- Now you have an excel doc that you can edit. Make sure you leave all of the formats the same if this is a file that you plan on importing back into RTA. For example, the facility column has leading zeroes and if changed it will not import back in properly. If you are adding new part, vehicles, etc, make sure the data format is the same.
- Once you have made all the desired changes, again make sure to save the file as a .txt file so it can be imported back into RTA. To import this file back into RTA, go back to System > Utility > Parts > Export/Import, enter in the level 3 password.
- Now, make sure you select "Import," if you added parts/vehicles, make sure you select add non-file. If not, just select/locate the file using the magnifying glass and hit "OK." It will then run through and process your records.
