Create Driver Reports
The Driver Reports process starts off with-what else?-driver reported problems. The process of entering VDRs into the system is extremely user-friendly. The driver is guided through each step so he/she can finish up quickly and get back on the road or move ahead to the next task. To enter a driver report, complete the following steps.
- Bring up the driver entry screen. Depending on the setup, this can be done either by double-clicking on the Driver Reports shortcut on the desktop or by selecting WOs > Drivers Report Maintenance > Create Driver Reports from the RTA main menu (WDC).
- Enter the vehicle facility number or press F1 to select a facility from the lookup list.
- Enter the driver ID. Use either the assigned employee number or employee abbreviation. For security reasons, a lookup list is not available here.
- Enter the vehicle number or press F1 to select a vehicle from the lookup list.
- Enter the current vehicle meter reading or press ENTER to accept the default reading displayed. Whether or not this entry will update the actual vehicle meter reading in RTA depends on the setting of the Allow Odometer Update checkbox in the setup parameters (WDS).
- Enter the VDR and choose OK to input additional VDRs for the same vehicle.
- When all VDRs have been input, review the list of items reported (in the lower portion of the window) and then choose Post to submit the reports.
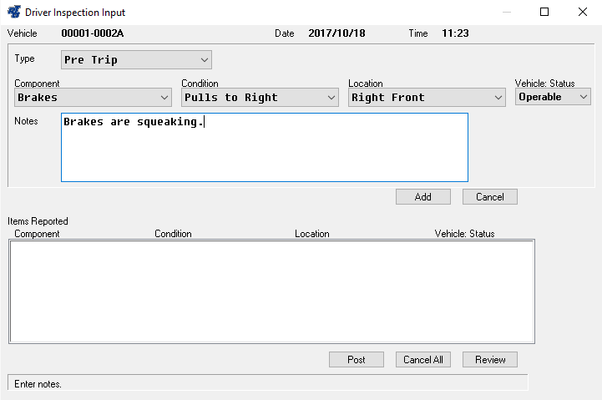
Enter individual items to report in the upper portion of this window.
A summary of each item entered appears in the lower portion of this window. When done, choose Post to submit the reported items.
Driver Entry Field Descriptions
- Type: Select Pre-Trip, Post-Trip inspection, or In-Service.
- Component: Select an area of the vehicle where the problem exists (e.g. Safety Mirror).
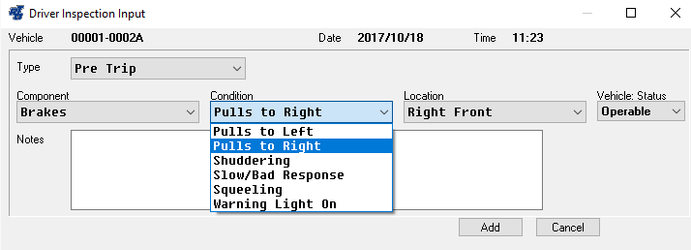
- Condition: Select a description that best describes the condition or the problem (e.g. Broken).
- Location: Select the location where the problem is occurring (e.g. Right Front).
- Status: Indicate whether the vehicle is Operable or Inoperable. This is a critical step in the process of the driver report. If the vehicle is Inoperable, or down, then it is no longer safe to drive on the streets and should be pulled out of service. Of course, the final decision on operability is made by the shop supervisor or technician.
- Notes: Enter notes to additionally describe/clarify the problem. These notes will appear as work order line notes when/if a work order is generated for this item.
- Review: Clicking on the 'Review' button will display a list of the previous 100 reports and the status of the defects reported.
That's all there is to it! Once these items have been input, choose OK to accept the report and repeat the process as needed. As each item is reported, a summary of the entry will appear in the box at the bottom of the window.
None of the items reported are actually saved until the Post button has been selected. If you need to delete any of the items shown, simply highlight that line item and press ENTER or double-click on it and then confirm the deletion of that entry. Once the VDRs have been posted, the system will return to the Driver ID prompt to await the next driver entry. The posted entries will be available for shop review and can be assigned to work orders at the discretion of the shop supervisor.
Customizing Component/Condition Codes
The Driver Reports module comes with a few pre-loaded Component/Condition codes. These user-definable codes are used to help describe and locate where a problem is occurring. To modify or add Component/Condition codes, do the following:
- Using your favorite text editor, edit the drvdata.txt file located in your fleet folder. Refer to "Drvdata.txt File Format" for the file layout requirements.
- To update the system with the changes/additions made to the drvdata.txt file, select WOs > Drivers Report Maintenance > Setup Driver Reports from the RTA main menu (WDS).
- Choose Relationships and then choose Yes to continue.
Drvdata.txt File Format
The drvdata.txt file contains <tags> for each component or area where a problem exists. Within an individual component description, you can add numerous subsets for the condition and location (see samples shown below). Enter up to 20 characters for each data item (columns 1-20). Additional information can be entered after the 20th column for notational purposes without affecting the data file.
Sample Data FileSample Outcome in Driver Reports
Editing Tips
- Three "tags" are needed for each data set and must appear in the data file exactly as shown below (case-sensitive).
Component
Conditions
Locations
- Only one item can be listed under the Component placeholder in each data set. Multiple items listed will not appear on the Component drop down list and the Condition and Location drop down lists will be empty.
- Use cut and paste to speed up the process of adding similar data sets.
- Data sets and the items in the data sets can be listed in any order. The system will automatically alphabetize items displayed in the drop down lists. Notice in the sample data file shown on the previous page that the conditions listed under the Transmission data set are listed in random order; however, they appear in alphabetical order in the drop down list.
- Although it is not necessary to have a blank line in between each data set, doing so will make locating or isolating a data group much easier.
- When entering a driver report in RTA (WDC), a Component, Condition, and Location must be specified. Therefore, the data file should contain at least one item under each "tag".
- You might want to make a description of Unknown or Not Listed available as a Condition in case other descriptions listed don't accurately describe the problem the driver is reporting. You may also want to have a Location of N/A available for components that are only in one area, such as windshields.