| Widget Connector | ||||||
|---|---|---|---|---|---|---|
|
Part Kits allow the posting user to select one Transaction which includes multiple, pre-determined parts to be added to a work order line. Traditionally these part kits are pre-assigned to Preventive Maintenance jobs, but part kits can be created for any type of job to assist in posting the correct parts consistently.
For additional details on creating a part kit in RTA Desktop, and further information on part kits in general, please see Part Kits
At this point, as of RTA Web version 1.4.0, part kits must be created as files in RTA Desktop in order to be posted regularly through RTA Web. That being said, part kits can either be pre-assigned to PM schedule lines or they can be added as a traditional part posting from the Work Order posting screen.
...
| Table of Contents | ||||
|---|---|---|---|---|
|
Part Kit Overview
A part kit is two or more parts that are used in conjunction with a particular job. There are many advantages to setting up and using part kits, including the following:
Standardize jobs-PM work, putting a vehicle into or out of service, brake or suspension work
Determine if parts are in stock prior to scheduling jobs
Facilitate pulling of parts needed for the jobs
Save time posting part entries
Part kits can be set in an asset’s PM records or added to WO Lines individually. When assigned to a PM schedule in the asset file, when a work order line is added for a PM service, the part kit number will be displayed when posting parts to the work order. The part kit can then be posted to the work order and all the components in the part kit will be posted at once.
Part kits can be used for any type of job that always uses the same group of parts.
Examples of Part Kits
Part Kit Number | Part Kit Used For… |
PMA-3.0L | An A PM on a 3.0L could include oil and an oil filter. |
PMC-5.0L | A C PM on a 5.0L engine. It could include oil, an oil filter, air filter, fuel filter, transmission filter, and ATF. |
TINSVC | Putting a tractor in service. It could include numerous decals, a fire extinguisher, reflector kit, flare kit, spot mirrors, CB Radio and antenna, custom mud flaps, and any other items which are used. |
4515TQ | A full brake could include the 4515 Timken Quick-change brake shoes, hardware kits, slack adjusters, seals and bearings, S-cams and bushings, etc. |
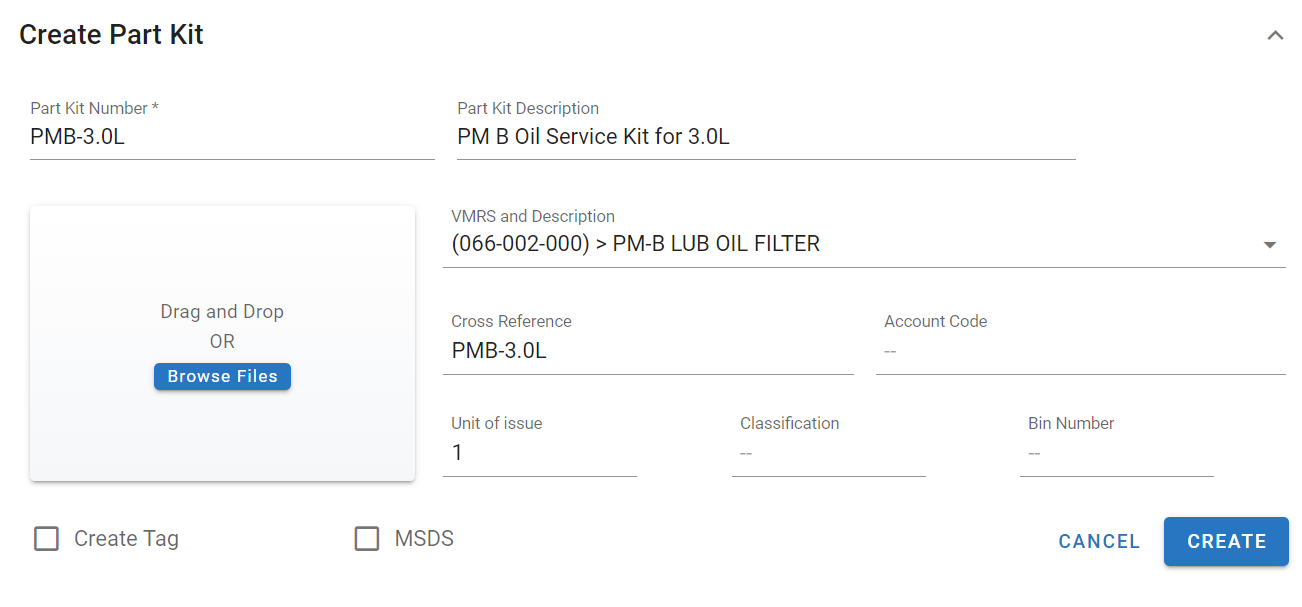
Creating A Part Kit
Access the Part Kits section in the main menu under Parts in Maint & Repair
Click the + button
Enter the following information:
Part Kit Number = Assign the kit a file number (see the examples above for ideas on creating a number that is descriptive and easy to identify)
Part Kit Description = Type out a description that gives detail regarding the part kit and its use case
VMRS and Description = Select the appropriate VMRS job code relevant to this kit (what job being performed uses this kit?)
Cross-Reference = This will default but can be changed as long as it is unique
Account Code = This is only applicable if the account codes are set up in the RTA system and being used
Unit of Issue = Enter the number of kits to be used at the job level
Classification = Use this field if wanting to classify the part kit
Bin Number = If compiling all the parts together to create a physical kit, use this field to denote where the kit is located
Create Tags = Check this box if printing part tags for this kit
MSDS = Check this box to indicate that a materials safety data sheet is available for this part kit
Add a profile picture for the part kit if desired
Click Create
| Tip |
|---|
Once created, the part kit file can be managed, have history and usage reviewed, add attachments, and apply fit codes to the part kit file. |
Assigning a Part Kit to a PM Schedule in Web
Click on the Assets Path in the main menu
Search and select an asset by clicking on it
Click on the Technical Info Tab in the asset file
Click on the Preventative Maintenance Schedule where the part kit will be assigned
Click in the PM Part Kit field
Select the part kit to be added or start typing the name of the part kit to find it
Click the check mark to save the selection in the field
PM Pre-Assigned Part Kits in Work Orders
If pre-assigned in the PM Schedule, or assigned on the Work Order before posting, a notification will show on the pageposting tab in the work order.
...
To post, click on Post Part Kit. The details of the kit will show in the Posting Box, allowing the user to select Quantity and Posting Date before clicking Post.
...
The full list of parts posted will now register in the Transactions boxThe work order line for the PM will also show the Part Kit title in the line details by clicking on the work order line and clicking the edit button.
Refer to Work Orders TOC for more information on work order creation and posting.
Part Kits on the Fly
If a part kit is was previously created, but is not assigned to this vehicle’s an asset’s PM Schedule or previously assigned as part of the Work Order Line, the user is able to use the Part Search to look it up, then post the kit as if it were any other traditional part.
...
Search the “PMB” or “KIT” if you know those details, but the user will need to select the proper kit to add to the Work Order Line.
...
Click the Kit you want to use, and set the quantity and posting date before selecting Post. The parts included in the kit will be posted as Transactions.
...
| Warning |
|---|
A part kit will not be able to be posted to a work order if any of the individual parts in the kit do not have sufficient stock available. |