Part Kits
- Enoch Poston
A part kit is two or more parts that are generally used in conjunction with a particular job. There are many advantages to setting up and using part kits, including the following:
- Standardize jobs-PM work, putting a vehicle into or out of service, brake or suspension work
- Determine if parts are in stock prior to scheduling jobs
- Facilitate pulling of parts needed for the jobs
- Save time posting part entries
There are a couple of system switches relating to part kits that should be reviewed. These switches are located in Misc. Parameters I (SSI, Miscellaneous I tab); we recommend setting both switches to YES if you'll be using part kits.
- Prompt for Part Kit (switch 34): This switch controls whether the Part kit field is available while adding work order lines.
- Print Parts Pick List (switch 35): This switch controls whether a parts pick list will be printed automatically whenever Shop, Mechanic Copy and Time Stamp work orders are printed.
Part kits can be set in vehicle PM records (MVM, PM Schedule sub-window). When a work order line is added for a PM service, the part kit number will be displayed. A parts pick list can be printed with the Shop, Mechanic Copy and Time Stamp work orders so mechanics can quickly determine exactly which parts are needed to complete the PM. When posting parts to work orders, the assigned PM part kit number is displayed on the screen for reference. Then, rather than individually posting each part used, the part kit can be posted and all the components in the part kit will be posted to the work order. The parts inventory will be decremented and the costs posted to the vehicle.
The use of part kits isn't limited to PM jobs though. Part kits can be used for any type of jobs that always use the same group of parts.
Part Kit Number | Part Kit Used For… |
PMA-3.0L | An A PM on a 3.0L engine.It could include oil and an oil filter. |
PMC-5.0L | A C PM on a 5.0L engine. It could include oil, an oil filter, air filter, fuel filter, transmission filter, and ATF. |
TINSVC | Putting a tractor in service. It could include numerous decals, a fire extinguisher, reflector kit, flare kit, spot mirrors, CB Radio and antenna, custom mud flaps, and any other items which are used. |
4515TQ | A full brake job.It could include the 4515 Timken Quick-change brake shoes, hardware kits, slack adjusters, seals and bearings, S-cams and bushings, etc. |
Sample Part Kits
Adding a Part Kit through File Maintenance
Add part records for all components in a part kit before adding the actual part kit. Refer to "Adding a Part" for instructions if necessary. To add a part kit record, do the following:
- Select Master > Part > Kit > File Maintenance from the RTA main menu (MPKM).
- Enter a part kit number and choose Add. The part kit number is a text field allowing up to 25 characters. We recommend omitting spaces from part kit numbers.
- Enter the part kit information. It's not necessary to enter data in every tab or every field. Many of the fields are provided for your benefit and aren't used by the RTA system; those that are will be noted in the description.
- Save the record.
Adding a Part Kit "On-the-Fly"
New part kit records can be added "on-the-fly" through the vehicle PM record (MVM, PM Schedule sub-window). This method allows part kits to be quickly added into the RTA system while setting up PM records. To add a part kit record "on-the-fly", do the following:
- Create or edit a PM record in the usual manner (MVM, PM schedule sub-window).
- When prompted for a part kit number, enter a non-file part kit number.
- Choose Yes when prompted to add the part kit. The part kit record screen comes up.
- Enter the part kit information. It's not necessary to enter data in every tab or every field. Many of the fields are provided for your benefit and aren't used by the RTA system; those that are will be noted in the description.
- Save the record.
Part Kit Record Field Descriptions: Main Window
- Description: Enter up to 40 characters for the part kit description.
- Cross reference: Enter a cross-reference number or press ENTER to accept the default number. This number must be unique for each part and part kit since it can be used in place of the primary number in many areas of the RTA system.
- Account code: Enter up to 25 characters for the account code or press F1 to select an account code from the lookup list. Only account codes added through the Update Account # option are displayed on the lookup list (STPA). This field can be useful to denote a general ledger account number or other information for accounting purposes.
- Classification: Enter up to 12 characters to classify the part kits as needed.
- Unit of issue: Enter up to three characters to describe the unit of issue charged out (e.g., EA, QT, FT).
- VMRS code: Enter the VMRS code for this part kit or press F1 to select a VMRS code from the lookup list.
- Bin number: Enter up to ten characters for the location where this part kit is stored. Assigning a unique, meaningful bin location can save parts personnel a lot of time when looking for parts. For example, you could assign a bin location of 230205 for a kit located in aisle 23, shelf 2, position 5.
- Create tags: Select the checkbox if you'll be printing part tags for this kit. If this option is active, tag records will be created when this kit is ordered and received through purchase orders and when you opt to manually create tags. Leave the checkbox blank if you won't be printing part tags for this part kit.
- MSDS: Select the checkbox to indicate that a materials safety data sheet is available for this part kit.
Part Kit Record Field Descriptions: Component Information Tab
The Component Info tab allows an unlimited number of parts or components in the part kit to be defined. When possible, save time by importing components from another part kit by selecting Utilities > Import Components from the menu or clicking on the Import Parts icon in the toolbar. For example, you can set up a part kit for an A PM. Then, when setting up a part kit for a B PM, rather than inputting the parts contained in both kits one by one, you can import the components from the A PM part kit and then add the remaining components required for the B PM partkit!
To add individual components to a part kit, do the following:
- Select the Component Info tab if it isn't currently the primary tab displayed on the screen.
- Select Edit > Add Component from the menu or click on the Add Component icon in the toolbar. See TIP below.
- Enter the part number included in the kit or press F1 to select a part from the lookup list.
- Enter the part quantity contained in the kit. The part description, bin number, price, and on hand quantity will be displayed automatically; this information cannot be modified.
- Verify the part number and quantity and choose OK to add the part to the part kit.
- Repeat steps 4 – 6 until all components have been added to the part kit.
TIP: When possible, save time by importing components from another part kit by selecting Utilities > Import Components from the menu or clicking on the Import Parts icon in the toolbar. For example, you can set up a part kit for an A PM. Then, when setting up a part kit for a B PM, rather than inputting the parts contained in both kits one by one, you can import the components from the A PM part kit and then add the remaining components required for the B PM partkit!
Part Kit Record Field Descriptions: Usage Information Tab
The RTA system automatically updates usage as part kits are issued and also when end of period for parts is processed (SEP). Period 1 is always the current period, period 2 is the previous period, and so forth. You may leave this information blank or input the previous usage if you want immediate usage history. Enter previous usage history by inputting the quantity in each period or by inputting a quantity in the Yearly usage field. The Average period usage will be calculated and displayed on the screen.
Part Kit Record Field Descriptions: Fit Codes Tab
Fit codes can be used for many different purposes; here are a few ideas. A fit code could represent the vehicle on which this part kit fits (e.g., A fit code of F150 means this part fits on a Ford 150). A list of part kits that fit on Ford 150's could then be generated easily (MPLF). Another use for fit codes is classifying the season in which a part kit is primarily used OR identifying the quarter in which cycle counts are done. A report could then be printed during a particular quarter when it is time to do inventory. You can add an unlimited number of fit codes, up to eight characters each.
- Select the Fit Codes tab if it isn't currently the primary tab displayed on the screen.
- Select Edit > Edit Fit Code from the menu or click on the Add Fit Code icon in the toolbar.
- Enter up to eight characters for the fit code and then choose OK to add the fit code.
- Repeat step 3 until all fit codes have been added; choose Cancel when done.
In addition to the fit codes, two fields are provided to identify manufacturers. Enter manufacturer information as needed. These fields are provided for your benefit and are not used by the RTA system.
Changing a Part Kit
To make changes to a part kit record, do the following:
- Select Master > Part > Kit > File Maintenance from the RTA main menu (MPKM).
- Enter a part kit number or press F1 to select a part kit from the lookup list.
- Make the changes as needed.
- Save the record.
Deleting a Part Kit
To delete a part kit, do the following:
- Select Master > Part > Kit > File Maintenance from the RTA main menu (MPKM).
- Enter a part kit number or press F1 to select a part kit from the lookup list.
- Select Utilities > Delete Part Kit from the menu or click on the Delete Part Kit icon in the toolbar.
- Choose Yes to confirm the deletion.
Assigning a Part Kit
Part kits can be assigned to vehicle PM records and work order lines. Refer to "Preventive Maintenance" or "Adding a Work Order" for instructions.
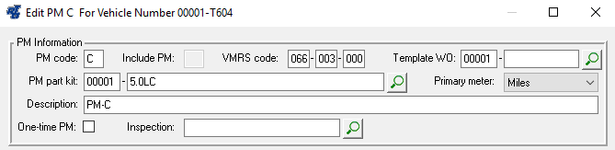 Part Kit Assigned Through PM Record
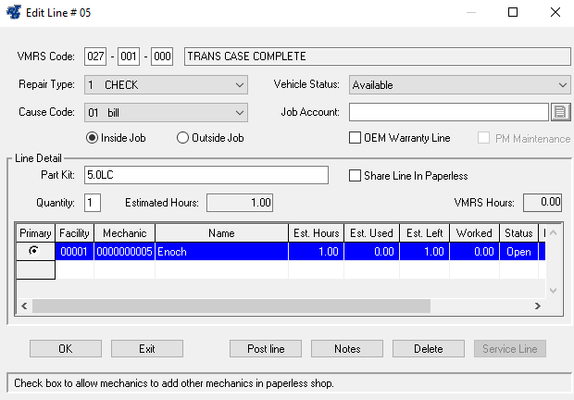 Part Kit Assigned Through Work Order Line
Printing a Parts Pick List
When a part kit is assigned to a work order line, a parts pick list can be printed to help the mechanic or parts person quickly grab the parts needed to complete the job. To print a pick list, do the following:
- Select WOs > WOs from the RTA main menu (WW).
- Enter a work order number or press F1 to select a work order from the lookup list.
- Enter the meter reading, posting date, posting period as prompted.
- Select File > Print from the menu or click on the Print WO icon in the toolbar.
- Choose Shop WO, Mechanic Copy or Time Stamp WO to print the work order and pick list (the "Print Parts Pick List" switch must be set to YES) OR choose Part pick list to only print the pick list.