Use the Categories window to select which data to use on the report. The left pane shows the data categories you can access. To see the fields in a category, select it and click the View Category Fields icon.
If the report has a custom SQL category then it cannot have any other categories. You can click the SQL icon to edit the SQL statement. See SQL Categories below for more information.
What are Data Categories?
Data categories are tables of data, which are organized by rows and columns. Columns are also known as data fields. A row of data has entries for one or more columns in the category. When you add a data field onto a report you are seeing the information in one column of data for every row in the category.
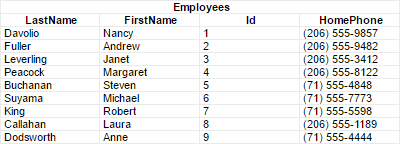
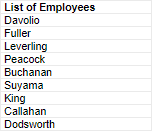
For example, a data category for Employees could have columns for the first and last names of each employee, an identification number, and a home phone number. Each row represents a person, and each column contains a specific type of information such as last name or phone number.
Example of a data category for employee records
You add entire categories at a time to a report, but in the report view you select only the columns you want to see. When you add a data field to the report design, even though you only see one column, the rest of the table is still present behind the scenes. You will never lose the connections between items in each row, and you can always add more fields.
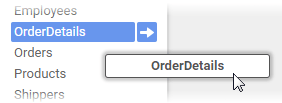
Dragging a category to the Category Name pane
Relationships Between Categories
Note: This information is intended for advanced users.
In the data source, data categories are joined to other categories by associating uniquely identifying data fields from one category to matching data fields in another. This means that if a row's identifying field matches one or more rows in a joined category, then those rows connect to an entire row or group of rows, which have their own separate data fields.
Only joined data categories, which are described as having a relation, can be added to the same report. This is why some categories may become unavailable as you add others. But data categories, even if they are not related to each other, may both be related to another category. If you add that category, then you can add both those categories, because there is now a join path between them.
For more information on how categories are related to each other, see Joins.
Suppressing Duplicates
Note: This information is intended for advanced users.
Be judicious when adding data categories. If you find that your report has unexpected duplicate values or empty rows, the cause is most likely that you have a one-to-many join to a category that you are not using.
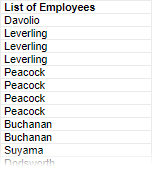
For example, this report has Employees and Orders categories. There is a one-to-many join from Employees to Orders, indicating that each Employee row is joined to one or more Order rows. Even though we are not using Orders on the report design, there are duplicate Employees because our join setup causes us to have a row for each Order, instead of each Employee.
Unexpected duplicate Employee values
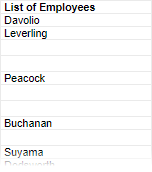
There are several ways to eliminate these duplicates. You can suppress duplicates for the Employees category, which will show blank rows for consecutive duplicates. In the Categories window, select the Suppress Duplicates check box for the Employees category.
Duplicate-suppressed category
You can also suppress duplicates for the cell, which will hide unnecessary duplicate rows. Select the cell and click the Suppress Duplicates icon. If a field from Orders is on the report, the behavior will be the same as suppressing duplicates for the category.
Duplicate-suppressed cell
Or, if you do not think you will need the Orders category, remove it from the report. In the Categories window, click the Delete Category icon next to Orders to remove the category. You can always add it again later if needed.
SQL Categories
You may have the ability to define a custom data model for the report without needing to use the predefined data categories. For databases which support unique or unusual behaviors that are not supported in the main interface, you can use custom SQL to supplement or bypass the standard Categories, Sorts, Filters, and Joins. Only new reports, created with the Report Wizard, can have a custom SQL category. You cannot add a custom SQL category to an existing report.
Caution: Writing custom SQL requires knowledge of the underlying databases and their relevant SQL query language. It is only recommended for advanced users.
To add a custom SQL data category, click Add SQL. From the Custom SQL Object window, add the following:
Object Name - Unique name for the custom category. It cannot be the same as an existing category. It cannot contain white space or the following characters:
[ ] { } . , @
Data Source - Select the data source to retrieve the data from.
Not every data source you can access may support custom SQL categories.
Enter the full SQL statement in the code window. Note that this will be inserted into a subquery when it is sent to the database for processing.
Optional: Parameters are system variables that contain different values depending on factors such as the person running the report. To include parameters in the SQL statement, select them from the Parameters list then click Add. Or enter the parameter name surrounded by At Signs (@).
Tip: A custom SQL category can only be the sole category on a report. A report cannot contain multiple custom SQL categories, or a mix of custom SQL and standard categories. Therefore, to include multiple tables on a report with custom SQL, you must retrieve multiple tables and join them in the SQL statement. If field names conflict, you can alias them in the SQL statement, or else the application will append a number to the end to preserve uniqueness.
Click the Test icon to check if the SQL is valid.
When you have finished writing the SQL, click the Unique Key Fields list and select the unique keys for the category.
Click Okay when done. If you have already sorted and filtered in the SQL statement, you can skip these menus.
Once added, you can edit the SQL category by clicking the SQL icon next to its name in the Categories window.


