Basic Info
If you have your own fuel tanks, you will want to add your tanks and pumps to the system. Otherwise, skip to the section titled “Entering Fuel Transaction”. Prior to building a Fuel Depot, you will want to collect the following data:
- Tank Capacities
- Current Tank Stick Readings
- Current Pump Meter Readings
- Current Cost of Fuel
Step by Step guide
- Select Master > Fuel > Tank Maintenance (MUM) from the RTA main menu.

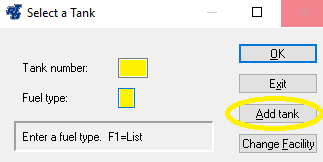
- In the “Tank Number” field, key in a numeric designation for the tank you wish to add. In the “Fuel Type” field key in the single upper-case alpha character for the fuel stored in this tank, or press “F1” for the lookup list. Select the “Add Tank” button.
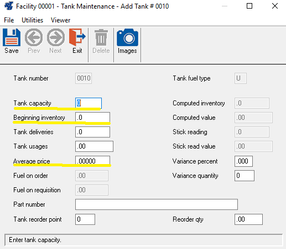
- Key the appropriate information into the “Tank Capacity”, “Beginning Inventory” and “Average Price” fields. The “Part number” field is used if you are tracking fuel purchases through purchase orders. NOTE: Do not enter anything into the “Tank Deliveries” or “Tank Usage” fields at this time; they will be updated by the system.