A key point in the RTA Fleet Management software is the tracking of parts used on vehicle repairs. Probably the most common way to track the parts is by having the mechanics write the down part numbers on the work orders. The problems with this method are that it's time-consuming for the mechanic and is prone to errors.
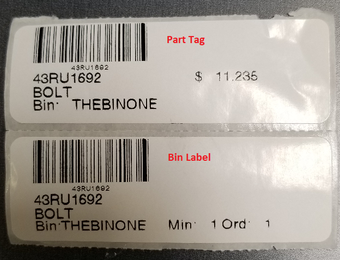
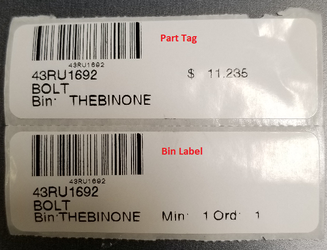
A better and more efficient way to track parts is through the use of parts tags. Tags can solve many of the problems of maintaining a parts inventory system. One of the hardest things about a manual inventory system is keeping track of where parts were used, how many were used, and when they were used. Deciphering (or finding) handwritten part numbers on a work order can be frustrating for the entry clerk. The part number may not be written down correctly, or it may not have the right price on it. By using part tags, many of these problems can be avoided since every part on the shelf will be tagged with a label. This way, when a part is pulled from the shelf, the part tag is also pulled. The part gets installed on the vehicle; the tag gets placed on the work order.
Bin labels can also be printed to help mechanics and parts personnel easily locate and identify needed parts. They are applied to the shelf or container where the parts are located. The use of bin labels helps to keep the parts room organized and orderly. The bin label makes it easy to identify a part that is currently out of stock and designates the place where the part is located. Part tags and bin labels can be printed with or without bar codes. The use of bar codes speeds up the process of tracking part inventory even more. When posting parts to work orders, the entry clerk or parts clerk simply scans in the bar code and keys in the part quantity. That's it. No searching, deciphering, or entry error! Taking physical inventory isn't so "physical" with the use of bar codes-scan the bar code, key in the part quantity, move onto on to the next part, scan the bar code, key in the part quantity, and so on. You're done taking inventory before you know it.
The Setup:
Setup and configure
bar codingbarcoding hardware if you haven't already done so (see "The Setup" in the previous section).
Set Create Tags for Tires in "Tire File Switches" as needed (SSM, switch 28).
Set the "Tags for Non-File Parts" switch as needed (SSI, Miscellaneous I tab, switch 23).
Set switches 1 - 4, dealing with tags and bin labels as needed (SSM, Parts Parameters tab).
Set the Create tags flag as needed in part records (MPM).
The Procedure:
Print and label existing inventory and bins.
Print and label parts as they are purchased, bin as they are created.
Pull labels and place on work orders or other documents as parts are used.
Post parts in the usual manner (to work orders, manual charge outs, etc.). When prompted for the part number, scan in the bar code. If you charge out parts over-the-counter, the use of piggyback labels comes in handy for heavy or large parts. Rather than carrying the item to the location where parts are normally scanned, you can simply peel off the part label to be scanned. Another solution is to keep a manual containing bar coded labels for these types of parts at the workstation. Be sure to use the Quick Post feature to save even more time when posting parts to work orders. Refer to "Quick Post" in Chapter 7-Work Orders for more information.
...
| Expand |
|---|
...
| ||
Setting the Create Tags FlagPart tags are created 1) manually, 2) when new parts are added to the system, and 3) when parts are received on purchase orders. But, in order for this to happen the Create tags flag must be active in the part record. This flag can be activated individually through the part record or globally for a range of parts using the Global Part Change program in the Utilities 2 add-on package (SIAG). To flag an individual part record for tags, do the following:
|
...
| Expand |
|---|
...
| ||
Creating Part TagsIn order to print part tags, the records must exist. There are three methods for creating the needed part tag records:
Each of these methods is described in the following sections.
|
| Expand | ||
|---|---|---|
| ||
Creating Part Tags ManuallyTo manually create part tags, do the following:
|
| Expand | ||
|---|---|---|
| ||
Creating Part Tags for Newly Added PartsThe process of creating tags for new parts added to inventory is very easy because it doesn't require any extra steps. Simply add the new part record in the usual manner, through the Part Inventory, Work Order, or Paperless Shop modules, and do the following:
As long as these two steps are completed, part tag records will be created for the specified quantity. Refer to "Adding a Part" in Chapter 5-Parts Inventory for instructions if necessary.
|
| Expand | ||
|---|---|---|
| ||
Creating Part Tags for Purchased PartsTo create tag records for parts received on purchase orders, do the following:
|
...
Refer to "Receiving Parts into Inventory" in Chapter 5-Parts Inventory for instructions if necessary. Tag records will be created for parts flagged for tag creation; however, they will not be created for parts that are flagged as non-chargeable parts. If you want part tags for non-chargeable parts, you'll need to create the tag records manually. |
...
| Expand |
|---|
...
| ||
Maintaining Part TagsIndividual part tag records can be added, viewed, changed, or deleted by using the Tag Maintenance option. To do so, select Parts > Tags/Labels > Tag Maintenance from the RTA main menu (PTM) and the Tag Maintenance window appears.
|
| Expand | ||
|---|---|---|
| ||
Adding Tag Records for a PartTo add tag records for a part:
|
| Expand | ||
|---|---|---|
| ||
Changing Tag Quantity for a PartTo change the number of tags to print for a part:
|
| Expand | ||
|---|---|---|
| ||
Deleting Tag Records for a PartTo delete tag records for a part:
|
...
| Expand |
|---|
...
| ||
Printing Part TagsAs described earlier, tags can be created 1) manually, 2) by adding new parts to the system, and 3) by receiving parts on purchase orders. The tags print routine has also been broken up so tags can be printed for the task at hand. For example, you may have just received a PO of 15 parts and don't want to print all tags on file, just the ones for the parts received.
Prompt Descriptions
|
...
|
...
| Expand |
|---|
...
| ||
Printing Bin LabelsTo print bin labels, select Parts > Tags/Labels > Print Bin Labels from the RTA main menu (PTB). The prompts displayed vary depending on the setting of the Bin field in the RTA printer record (SPM) and the tag type setting in the Parts Parameters (SSM, Parts Parameters tab, switch 1). The setting value will be noted in ( ).
|
|
|