How to Migrate to a New Server(SQL)
This article describes the process for moving RTA's back end database to a new SQL Server Instance. If you have any questions please contact RTA Tech Support. If you are wanting to create a test environment of RTA, please refer to the article titled "How to Create a Test System(SQL)".
*If you need to move the database in a flat file Vision version of RTA, please refer to the article titled "How to Migrate to a New Server(Vision)".
What Version Are you Running?
Step by Step Guide
You’ll need the 9121_Locks_and_Procs_NOMASTER.sql scripts to proceed with this. Also note, this document assumes that your database names are RTAFleet and RTALocks. If they are different, you’ll need to check the 9121_Locks_and_Procs_NOMASTER.sql scripts to make sure they reference your databases and not another. Use the Find Replace feature to replace RTAFleet and RTALocks with your database names. At this point, we recommend using the nomaster version of the scripts, as it doesn’t put any procedures in the master database.
- First, you’ll need everyone out while you take the backup and change the pointer for SQL Server.
- Restore the backup of RTAFleet from the current SQL server to the new SQL server. Do not attempt to use DTS or SSIS to move the data from one sql server to another. You must use the backup/restore method or the detach/copy/attach method. Each table has an Identity column that will lose its Identity property when created through DTS or SSIS, resulting in a 9D/515 error when you attempt to add a new record to RTA.
- Run the 9121_Locks_and_Procs_NOMASTER.sql script on the new SQL Server. You may need to contact Tech Support at RTA and ask them to provide this to you. The script creates necessary stored procedures that are required for the runtime to access your SQL Server and creates the RTALocks db.
If you receive a 9D/11 error when attempting to log in to RTA after the migration, it is either because this step was not run or you have the wrong version of the setup script. Please contact RTA if you have run this script and still get the error.- Make sure the user(s) have rights to access and update these two databases. You can use either SQL authentication or NT Authentication. Regardless, you will need to assign the db_owner role to this user/group on both databases (RTAFleet and RTALocks)
- Run the following command in the fleet directory:
wrun32 -c cblconfi -w dblogin.cob
You should see the following screen: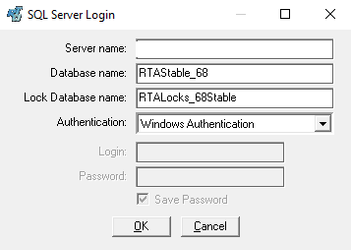
Change the server name, and make sure the database names are correct as well. Before clicking ok: Make sure that the login specified in this file has been created on the new SQL Server and that the passwords match if using SQL Authentication. Make sure you’ve added this user to the db_owner role on RTAFleet and RTALocks as described in step 3. - Click OK, and the system will validate that
The SQL Server exists and accepts incoming connections
- The user exists and can login to the SQL Server
- The user can select data from RTAFleet
- If you receive an error, take a screenshot of it, and contact RTA Tech Support. The error message is a SQL Server error most likely, and Googling the error can also be helpful in determining the cause.
- Try opening RTA. You should be able to connect and read data from the new SQL Server. Stop the old SQL Server, or detach the old RTA databases to ensure that you are looking at the correct SQL Server.
Pre-requisites
- 1000_Locks_and_Procs_NOMASTER.sql
- Note, this document assumes that your database names are ‘RTAFleet’ and ‘RTALocks’. If they are different, you’ll need to update the 1000_Locks_and_Procs_NOMASTER.sql scripts to make sure they reference your databases and not the default ‘RTAFleet’ and ‘RTALocks’. If you are using a ‘non-standard database name, use the Find Replace feature in SSMS to replace ‘RTAFleet’ and ‘RTALocks’ with your database names.
- New SQL server instance to migrate to.
- You need to either have an existing SQL server to migrate RTA to, or the SQL instance needs to be up and running prior to executing this process.
Process
- First, you’ll need everyone out of the RTA System while you do this entire process.
- Backup ‘RTAFleet’ from the current SQL server.
- Do not attempt to use DTS or SSIS to move the data from one SQL server to another.
- You must use the backup/restore method or the detach/copy/attach method. Each table has an Identity column that will lose its Identity property when created through DTS or SSIS, resulting in a 9D/515 error when you attempt to add a new record to RTA.
- If you are moving the application directory, copy the entire contents of that folder to the new location.
- Restore ‘RTAFleet’ to new SQL server.
- Run the 1000_Locks_and_Procs_NOMASTER.sql script on the new SQL Server.
- This script is typically found in the root directory of the Fleet folder which contains the software. The script creates necessary stored procedures that are required for the runtime to access your SQL Server and creates the ‘RTALocks’ database.
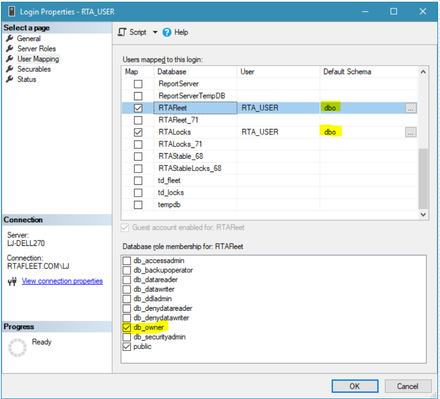
- Make sure the user(s) have rights to access and update these two databases. You can use either SQL authentication or NT Authentication. Regardless, you will need to assign the db_owner role to this user/group on both databases (RTAFleet and RTALocks) as well as assign the Default Schema as dbo for both databases (RTAFleet and RTALocks)
-
- Run the following command in the root of the fleet directory:
- RTA.exe /p:dblogin.cob
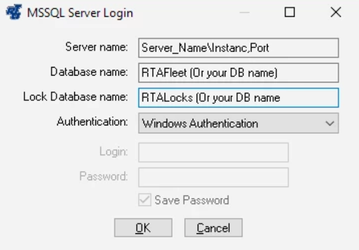
- You should see the following screen:
- If you receive a 9D/11 error when attempting to log in to RTA after the migration, it is either because the 1000_locks_and_procs step was not run, or you have the wrong version of the setup script. Please contact RTA if you have run this script and still get the error.
- Change the server name, and make sure the database names are correct as well. This will fail if the login specified in this file has not been created on the new SQL Server and if the passwords don’t match if using SQL Authentication. Make sure you’ve added this user to the db_owner role on ‘RTAFleet’ and ‘RTALocks’ as described in step 5.
- Click OK, and the system will validate that:
- The SQL Server exists and accepts incoming connections
- The user exists and can login to the SQL Server
- The user can select data from RTAFleet
- If you receive an error, take a screenshot of it, and contact RTA Tech Support. The error message is usually an SQL Server error. Researching the error can also be helpful in determining the cause of the failure.
- Run RTA. You should be able to connect to the new database location and read and write data to and from the new SQL Server.
- Stop the old SQL Server or detach the old RTA databases to ensure that your RTA is looking at the correct SQL Server.
- If you have moved the application directory:
- On each client machine that runs the RTA program, redirect their shortcuts to the new location of the Fleet directory. The standard icon should launch “RTA.exe”.
*Note* If you are running 7.2.5 and later, you will need to run the client installation after migrating on every machine for the F1 Lookup Lists to work.