Creating a Paperless Inspection
- Enoch Poston
- Dallin Dastrup
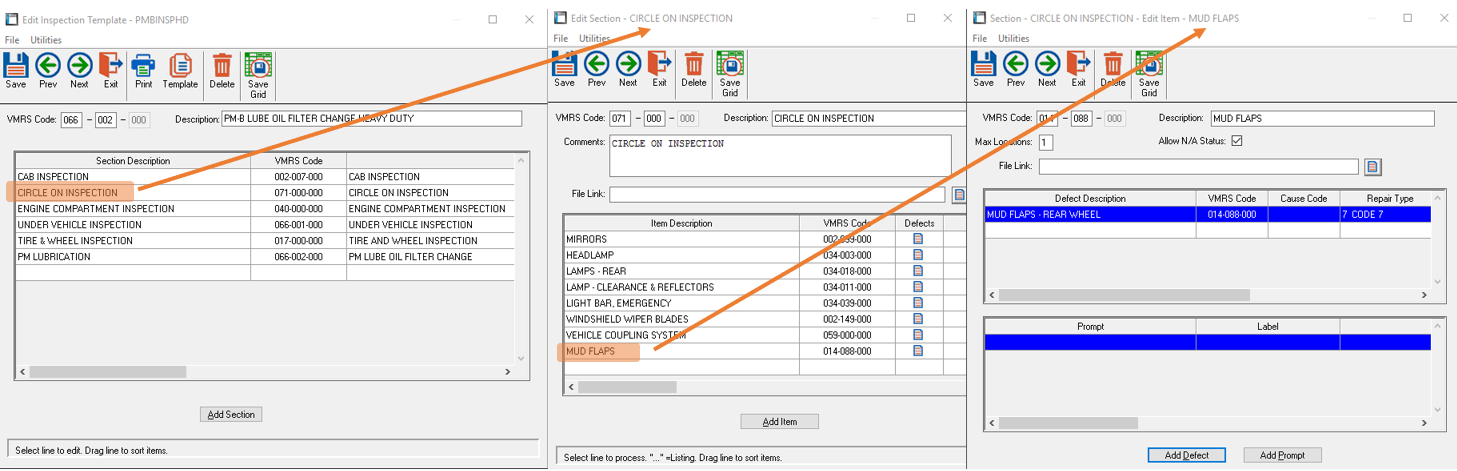
1. Add an Inspection Template (WNM)
The Inspection Template should be created similar to a master copy of paper inspection form. You are simply creating an electronic copy of an inspection form that you likely are already using.
- Enter a name for the new inspection and click the 'Add' button.
- If a similar inspection already exists in the system, it can be used as a template by answering the prompt.
- Select a VMRS code and description for the Inspection header. The description is filled in based on the VMRS code, but can be changed if desired.
Note: There is a "Template" button on the toolbar. This allows you to template another inspection onto the current template. This is handy since some inspections are similar but perhaps more detailed.
Add Sections to the Inspection
Sections form the different areas of the inspection form. Each section has it's own header identified by a separate VMRS code. Comments can be added to each section, which are viewed by the mechanic during the inspection process. A 'File Link' allows you to attach a document or file to the section for a mechanic to view during the inspection.
- Click the 'Add Section' button.
- Select a VMRS code and description for the section.
- Enter optional comments to be visible to the mechanic during the inspection process, if desired.
- Optionally select a file or document to include with this section of the inspection, if desired. Click the browse button to select a file from the windows file explorer.
Add Items to be inspected to each section
Create a list of several items that the mechanic will need to inspect during the entire inspection process.
- Click the 'Add Item' button.
- Select a VMRS code and description for the item to be inspected.
- Enter the Max locations: How many areas can or need to be inspected (i.e. Tires could have anywhere from 2 – 10 or more on one vehicle). When answering prompts, you can fill them in this many times.
- File Link: optionally select a file for a mechanic to view while inspecting the item.
Add Defects to each Item
Create a list of all possible defects that could be found for the item being inspected. If an items fails the inspection, the mechanic will select from these defects to identify the problem and a repair item will be created on a work order. Defects must be added to the template in order to mark an item as defective unless an override password is provided. The list of defects can be very specific or quite generic, depending on the level of detail desired. Default repair types can be assigned to each defect. RTA recommends adding "Other" as a generic defect in addition to specific defects.
- Click the 'Add Defect' button.
- Select a VMRS code for the possible defect. If the mechanic marks the item as defective during the inspection, this VMRS code will be used on the work order to indicate the repair type needing to be addressed.
- Select a cause code (if applicable) and repair type code when prompted.
Add Note Prompts to each Item
Prompt for information to be noted during the inspection. The mechanic's response to these prompts will be added to line notes for the Inspection line item. If multiple locations were indicated when adding the item, only one set of prompts needs to be added as it will be repeated for each location if there's more than one. A prompt can be marked as required. If a prompt is required, the inspection cannot be closed without answering prompt. If using more than one location, be sure to ask for the location name in the prompt so that the notes will designate the proper location.
- Click the 'Add Prompt' button.
- Prompt: Type the message to be displayed to the mechanic.
- Label: How you want the answer displayed on the work order line notes.
- Required: Check the box to prevent the inspection item from being completed without the prompt information being entered.