Setup Steps
- Enoch Poston
- Edit the printer settings to enable bar code printing (SPM)
- Edit the default Tag printer in user record (SUM)
- Run BarCode It (PTP)
- Select the bar code type
- Select the desired database
- Select the appropriate range
Bar codes can be printed using IBM graphics compatibility (dot matrix), TrueType fonts, or fonts resident on the printer via a cartridge (or SIMMs or DIMMs). The two types of bar codes that RTA uses are Code 3 of 9 or Code 93. Code 3 of 9 is the current default; Code 93 is a high density barcode, allowing more digits per inch.
Step 1: Edit the Printers Settings to Enable Bar Code Printing
Use the examples as templates to edit your printer. To get started select System>Setup Printers>File Maintenance from the RTA main menu.
LASER PRINTERS
Using TrueType Fonts: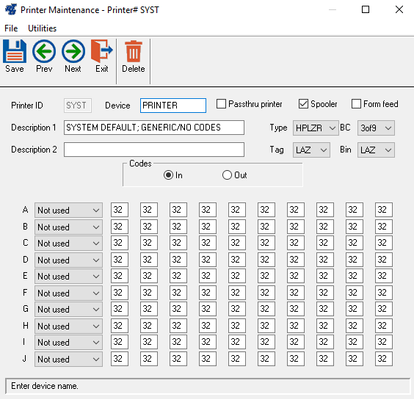
If you are using Laser as your printer type, the value in the "Spaces to Pad on Tag" switch (SSM, Parts Parameters tab, line 2) will need to be adjusted to shift the text to align to the bar code. This controls how different printers treat the sizing of fonts when printing.
BCLZ
Notice:
- Device = PRINTER
- Ptr Type = HPLZR
- Tag = LAZ*
- No codes in A
*For 2 column forms, Tag = LZ2
Using Font Cartridge:
Code 93 is not valid if you are using a bar code cartridge. Instead, Code 3 of 9 bar codes will always be printed, regardless of the choice made.
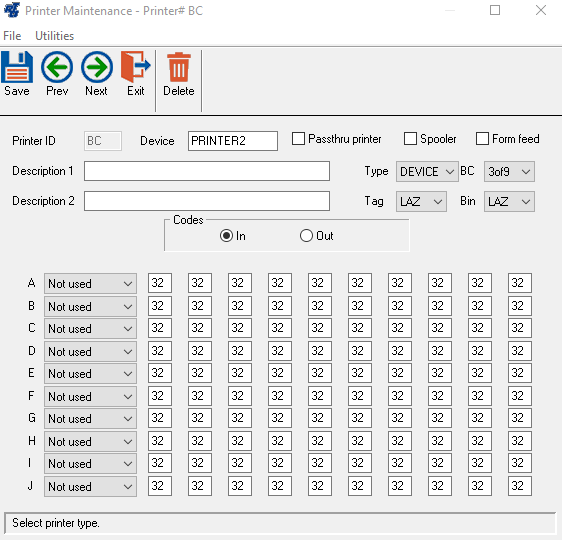
BCL2
Notice:
- Device = PRINTER2
- Ptr Type = DEVICE
- Tag = LAZ
- No codes in A
For laser printers, BarCode It's Start on Tag option reduces waste by allowing you to specify the exact position on the label sheet to begin printing. Count from the left to right, top to bottom to find the position number. For example, to start printing on the 3rd row, middle label of a 30-label sheet, enter 8 in the Start on Tag field.
DOT MATRIX PRINTERS
For 1 Inch Tags:
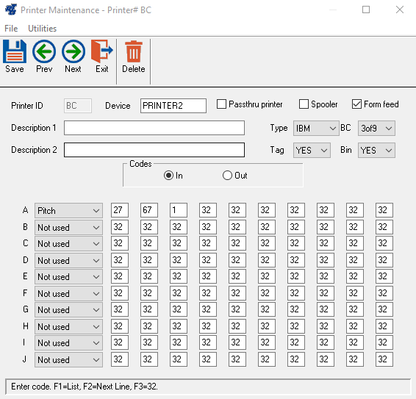
BCIC
Notice:
- Device = PRINTER2
- Ptr Type = IBM
- Frm Feed = Yes
- Tag = YES
- See codes in A
For 2 Inch Tags:
BCIS
Notice:
- Device = PRINTER2
- Ptr Type = IBM
- Frm Feed = Yes
- Tag = NO
- See codes in A
THERMAL PRINTERS
Ovation, C.Itoh and Citizen Models:
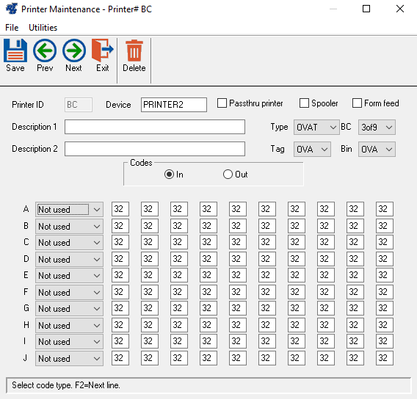
BCTH
Notice:
- Device = PRINTER2
- Ptr Type = OVAT
- Frm Feed = No
- Tag = Ova
- No codes in A
Example: The thermal printer as shown above is a direct-spooled printer. This means that RTA will send all control codes needed to the printer. Setup should follow the above print screen (BCTH). DEVICE is set to PRINTER2, which is defined in the cblconfi file as -P SPOOLER-DIRECT. Ptr Type should be set to OVAT, which denotes a thermal printer. Tag should also be Ova for the thermal printer. Printer control codes Codes IN and Codes OUT are not used and should be left as 032.
Step 2: Edit the Default Tag Printer in the User Record (SUM)
This program will initialize to the Tag Printer defined in the user record. This allows the user to pre-define the RTA printer settings for BarCode It.
The only way to switch printers in BarCode It is to switch to a user with an alternate printer or edit the ccurrent user's Tag Printer and then restart RTA. Whenever RTA starts up, it reads the user's default settings, including the default tag printer.
Step 3: Run BarCode It (PTP)
Select Parts>Tags/Labels>Print Misc. Tags from the RTA main menu.
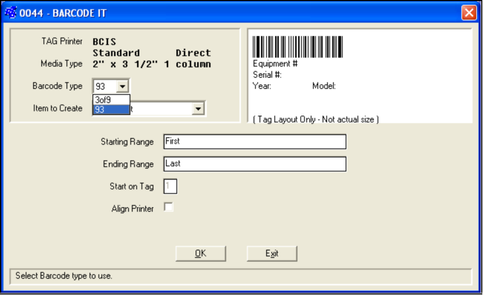
Select the Barcode Type.
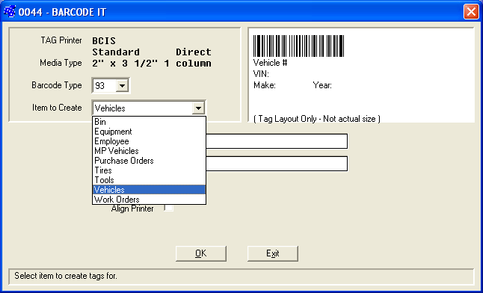
Select the desired Item to Create.
Select the desired data range.
You should get output similar to the previewed bar code in the program.