Tire Procedures
- Enoch Poston
Tire processes include the following transactions:
- Mounting a tire
- Dismounting a tire
- Returning a tire from the capper
- Changing a tire status
- Updating Tire Tread Depth readings
Mounting a Tire
In order to mount tires onto a vehicle, the tire status must be INVENTORY. If a tire that's linked to a part record is mounted, the inventory level will be reduced. If the quantity on hand falls below the reorder point, a requisition will be created to order additional tires. Tires can be mounted:
- Directly through the tire record
- By using the Mount program
- By posting tire transactions to work orders
The first two options allow you to track tire inventory, tire cost and usage, and updates vehicle costs without requiring the use of work orders. However, if you're using the Work Order and/or Paperless Shop modules, we highly recommend mounting tires through work orders for the following reasons:
- Better audit trail
- Tire transactions are included on vehicle history reports
- Tire transactions accounted for on work order reports
- Tire transactions are included on customer/departmental work order billings
- Mechanic productivity is accounted
Regardless of which method gets used, all transactions will be available on the tire reports. Once a tire is mounted on a vehicle, it becomes "attached" to the vehicle—meaning the tire records and histories go wherever the vehicle goes. For example, if a tire from facility 00001 is mounted on a vehicle that resides in facility 00002, the tire records will be moved to facility 00002. If the vehicle is later renumbered to a new facility, the tire records will also be renumbered to the new facility.
Also, when a tire is mounted, the entire cost of the tire is charged to the vehicle, and the tire will have a current value of $ 0.00. This causes the vehicle costs for the current period to be higher than normal, but it is a true cost and does balance out over time. Tire warranties are automatically tracked for mounted tires based on the manufacturer's estimated tire life. If a tire is dismounted before all the warranted miles have been used up, the system will calculate the pro-rated credit due from the tire manufacturer or dealer.
Mounting Through the Tire Record or Mount Program
- Select Master > Tire > File Maintenance or Tires > Mount from the RTA main menu (MTM, TM).
- Enter a tire number or press F1 to select a tire from the lookup list.
- If you're mounting through the tire record, select Utilities > Mount/Dismount from the menu or click on the Mount/Dismount icon in the toolbar.
- Enter the facility and vehicle number on which to mount the tire or press F1 to make the selection from a lookup list.
- Accept the current system date as the mount date, enter a new date, or press F1 to select a date from the calendar.
- Accept the current meter reading as the mount odometer or enter a new meter reading.
- Specify the position where the tire will be mounted or press F1 to select a position from the lookup list. Press F2 to view a list of tires already mounted on the vehicle.
- Select Trackable units to track tire mileage; deselect to not track tire mileage (as is the case of spare tires).
Mounting by Posting a Tire Transaction to a Work Order
Tires can be mounted by posting tire transactions to work orders, which can be done through the Work Order and Paperless Shop modules. The instructions for using this feature assume you have a working knowledge of the work order and Paperless Shop programs. For additional information, refer to "Work Orders" or the Paperless Shop User's Manual.
- Select WOs > WOs or WOs > Batch WOs or WOs > Paperless Shop > Login from the RTA main menu (WW, WB, WPL).
- Create a new work order, bring up an existing one, or clock onto the appropriate job.
- Select the necessary options to bring up the Post Tires window.
- Enter a tire number or choose Inventory List (F1) to select a tire from the lookup list.
- Choose OK to mount the specified tire.
- Choose Yes when prompted for confirmation.
- Specify the position where the tire will be mounted or choose Position list (F2) to select a position from a lookup list. To view a list of tires already mounted on the vehicle, choose Mounted list (F1).
Dismounting a Tire
In order to dismount tires from a vehicle, the tire status must be MOUNTED. Tires can be dismounted:
- Directly through the tire record
- By using the Dismount program
- By posting tire transactions to work orders
The first two options allow you to track tire inventory, tire cost and usage, and updates vehicle costs without requiring the use of work orders. However, if you're using the Work Order and/or Paperless Shop modules, we highly recommend dismounting tires through work orders for the same reasons stated in the previous section. Regardless of which method gets used, all transactions will be available on the tire reports.
Tire warranties are automatically tracked for mounted tires based on the manufacturer's estimated tire life. If a tire is dismounted before all the warranted miles have been used up, the system will calculate the pro-rated credit due from the tire manufacturer or dealer. The credit value is credited back to the tire and becomes the new current value for the tire. It is also credited back to the vehicle and subtracted from the vehicle costs.
Dismounting Through the Tire Record or Mount Program
- Select Master > Tire > File Maintenance or Tires > Dismount from the RTA main menu (MTM, TD).
- Enter a tire number or press F1 (all tires) or F2 (mounted tires) to select a tire from a lookup list.
- If you're dismounting through the tire record, select Utilities > Mount/Dismount from the menu or click on the Mount/Dismount icon in the toolbar.
- Accept the current meter reading as the dismount odometer or enter a new meter reading.
- Accept the current system date as the dismount date, enter a new date, or press F1 to select a date from the calendar.
- The tire usage miles, percentages, and pro-rated credit value are calculated and displayed on the screen. Accept the pro-rated credit shown or enter a new credit value.
- Accept the current tread depth (shown in the help line), enter the remaining tread depth, or press F1 to use a value of 0.
- Accept the current tire condition (shown in the help line), enter a new tire condition, or press F1 to leave the field blank.
- Select a tire destination from the drop down list. Tires can be sent to the capper, placed back in inventory, placed out of service, or scrapped. When sending tires to the capper, a capper number is required. When scrapping tires, a scrap reason and password level 1 are required.
- Choose OK to dismount the tire.
- Choose Yes when prompted for a confirmation.
Dismounting by Posting a Tire Transaction to a Work Order
Tires can be dismounted by posting tire transactions to work orders, which can be done through the Work Order and Paperless Shop modules. The instructions for using this feature assume you have a working knowledge of the work order and Paperless Shop programs. For additional information, refer to Work Orders or the Paperless Shop User's Manual.
- Select WOs > WOs or WOs > Batch WOs or WOs > Paperless Shop > Login from the RTA main menu (WW, WB, WPL).
- Create a new work order, bring up an existing one, or clock onto the appropriate job.
- Select the necessary options to bring up the Post Tires window.
- Enter a tire number or choose Mounted List (F2) to select a tire from the lookup list.
- Choose OK to dismount the specified tire.
- Choose Yes when prompted for confirmation.
- Specify where the tire will be placed after it's dismounted. You'll be prompted for password level 1 if you choose to scrap the tire.
- Accept the pro-rated credit shown or enter a new credit value.
- Accept the current tread depth shown or enter the remaining tread depth.
- Accept the current tire condition shown or enter a new tire condition.
- If the tire is being sent to the capper, specify the capper number. If the tire is being scrapped, select a scrap reason.
Returning a Tire from the Capper
When tires are returned from the capper, do the following:
- Select Tires > Return from Capper from the RTA main menu (TR).
- Enter a tire number or press F1 to select a tire from the lookup list.Tires from your facility will be displayed.You may also use the drop-down list box to select tires that were originally from other facilities, were capped, and are now being returned to your facility.
- Select a radio button indicating the tire status.
- Capped: Returns the tire to inventory and increases the caps count by 1.
- Out of Service: Changes the tire status to OUT OF SERVICE, making the tire inactive.
- Uncapped: Returns the tire to inventory but does not increase the caps count.
- Scrap/Reject: Scraps the tire, deleting the tire record (password level 1 is required).
- Accept the default capper number, enter a new capper number, or press F1 to select a capper from the lookup list.
- Enter the tread type.
- Accept the current tread depth (shown in the help line), enter the remaining tread depth, or press F1 to use a value of 0.
- Accept the tire condition (shown in the help line), enter a new tire condition, or press F1 to leave the field blank.
- If the tire is capped, enter the cost to cap the tire. This cost is added to the current tire cost and becomes the new current value for the tire.
- If the tire is scrapped, select a scrap reason from the drop down list. You may be given the option of charging any remaining tire value to the previous vehicle on which this tire was mounted. Make the selection as needed.
Changing a Tire Status
The Change Status option allows tires currently in inventory to be sent to the capper, scrapped, or placed out of service AND allows tires that are currently out of service to be placed back into inventory or scrapped. Placing a tire out of service makes the tire inactive but keeps the tire record on file. Scrapping a tire deletes the tire record and places it in a scrapped tire file (not available for access); the tire history remains in the system until the scrapped tire records are purged from the system.
- Select Tires > Change Status from the RTA main menu (TC).
- Enter a tire number, press F1 to select an inventory tire from the lookup list, or press F2 to select an out of service tire from the lookup list.
- The next screen displayed varies depending on the status of the selected tire.
Inventory Tire Options
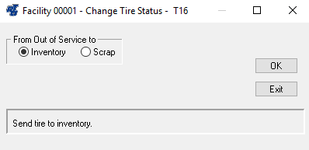
Out of Service Tire Options
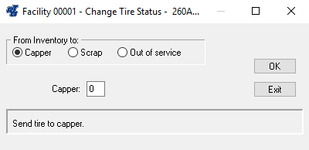
Select a radio button as needed. If you choose to send the tire to the Capper, you'll need to indicate the capper number. If you Scrap the tire (password level 1 is required), you'll need to indicate the scrap reason.
Recording a Tire Tread Depth Reading
The record tread depth option allows regular tread depth readings to be recorded and the accompanying reports will identify tires that need to be replaced or recapped soon. To record a tread depth reading, do the following:
- Select Tires > Update Tread from the RTA main menu (TU).
- Enter the tire number, or press F1 and select the tire from the list.
- Record the vehicle's current odometer reading, tire position, PSI, condition, and tread depth in 32nds.
- Click the OK button.
- Select another tire and record it's tread depth or exit when completed updating tires.