System Security
- Enoch Poston
- Tim Maldonado
Throughout the RTA system, password prompts come up when attempts are made to access options that have a big impact on the RTA system such as setting or changing system parameters, deleting records, and adjusting vehicle costs. The use of these passwords is automatic and does not require any special setup. There are three password levels. The passwords have a cascading effect meaning level 1 has the lowest authorization, level 3 the highest. When prompted for a level 1 password, password levels 1, 2, or 3 are accepted. When prompted for a level 2 password, password levels 2 or 3 are accepted. When prompted for a level 3 password, only password level 3 is accepted. The passwords are set up in Main System Parameters (SSM, switches 16-18). For companies that only have a few employees using the RTA system, the use of these three passwords may be all the security that's needed. Refer to "Manager's Page" later in the next section to review the areas in the RTA system that require a password.
Companies with many employees using the RTA system may need to set up extra security measures. The RTA system has a comprehensive security system that restricts users to certain facilities, regions, features, menus, screens, and fields. The System Security feature is ideal if:
- You want to prevent unauthorized access to the RTA system
- You're using multiple facilities and need to restrict users to their own facility
- You have regions and need to restrict users to a specific group of facilities
- You need to limit RTA access for various staff members to their specific job duties (allow parts personnel access to parts and purchase orders, service writers to work orders, etc.)
- You need to secure areas that affect how the RTA system functions (system parameters, printers, users)
Once System Security is implemented, users will be required to log in with a valid user ID and password before access to the RTA system is granted.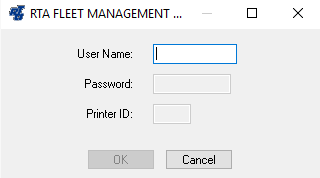
Users are given three attempts to log in with the correct user name and password. If successful, the RTA main menu is brought up. If the user attempts to access an item or area in which he/she is not allowed, an error message is displayed (shown above).
The Setup:
- Set up all user IDs, passwords, and privileges (SUM).
- Optionally set up user classes (SSY) and assign users to classes.
- Set the "System Security" switch to ON or SYS (SSI, Miscellaneous I tab, switch 9).
- Modify the user named SYSTEM by adding a password or delete the user from the system altogether (SUM). WARNING! DO NOT delete the user SYSTEM if you will not be using the System Security feature; doing so will make the RTA system inaccessible to all users! DO NOT delete the user SYSTEM if you are using the Paperless Shop add-on option and have set up a special login screen for the mechanics.
Adding a User
You should take the time to make a list of each user who will be allowed access to the RTA system, as well as the areas in the software they will have access. If you'd rather, you can setup one user record for an entire group. For example, you could add a user named MECH who has rights to access work order and part options but no rights to modify and delete vehicles. All mechanics would then login as MECH. The advantage to this method is that it is less time consuming to setup user records; the disadvantage is that you have less control over each user and they don't have individual default facilities, regions, printers, or access rights defined.
When adding new user records, you have the option of using existing records as a template. This is a great timesaving feature that allows you to add a user, set the privileges, and then use it as a template for adding other users with the same or similar privileges. When using a template, the new user is set up with the same rights as the template user. When creating record from scratch, the new user is set up with rights to everything as a default.
To add a user record, do the following:
- Select System > Setup Users > File Maintenance from the RTA main menu (SUM).
- Enter password level 3.
- Enter a user name and choose Add. The user name is a text field allowing up to ten characters.
- Specify whether to use a template (and the template user ID, if using a template).
- Set the user password and privileges.
- Save the record.
User Record Field Descriptions: Main Screen
- User Name: (Text field) Enter up to ten characters for the user name. This could be a person's initials, name, first name-last initial combination, last name-first initial combination, network login ID, workstation number, or it could be a group name (MECH, PARTS, DATA ENTRY, FUEL). A valid user ID (and password) is required at the login screen before access to the RTA system is granted. The user name is also used to indicate who created work orders and purchase orders.
- Password: Enter up to twelve characters for the user's password or leave this field blank if a password is not required. A valid password (and user ID) is required at the login screen before access to the RTA system is granted.
- Force New Password: Checking this box will require the user to change their password the next time they access the software.
- Facility: Enter this user's home facility or press F1 to select a facility from the lookup list. The specified facility is used as a default when the user accesses and processes data.
- Cross Facilities: Select this checkbox to allow this user to access data in other facilities; deselect to only allow access to data in the specified facility.
Region: This field is not currently used.
Employee ID: Used by the Messenger add-on module to associate the user login with an employee mailbox.
- Default Printer: Enter the default RTA printer for this user. The printer configurations from the specified printer will be used for print jobs executed by this user. A lookup list is not available here to select a printer from, but you can press F8 to view a list of printers that have been set up in RTA.
- Tag Printer: Enter the default RTA tag printer for this user. The printer configurations from the specified printer will be used when this user prints part tags and/or bin labels. A lookup list is not available here to select a printer from, but you can press F8 to view a list of printers that have been set up in RTA. Leave this field blank if this user will not be printing part tags or bin labels.
Video Card: Setting the video card will allow you to display 132 columns when RTA reports are viewed on the screen. Press F1 to toggle the value from 0 to one of the four values listed below or enter a number from 0-99 if your video card is not listed. Normally this option should be set to "0". Change only if the full 132 characters in the report viewer are not being displayed correctly by your graphics card.
Value
Type of Video Card
35
ATI Integra, VGA/Wonder, EGA Wonder
83
ATI Prism Elite, Trident Chip Sets
85
Paradise Systems
96
Chips and Technologies, Genoa 6000
- Enable Logins: Select this checkbox to allow this user to log into the RTA system; deselect to prohibit this user from being able to log in. This is a great feature to use during times when it's critical to keep users out of the system (e.g., rebuilding files, installing updates, processing end of period). This checkbox can be activated here for an individual user or globally for all users by running the lockrta.cob utility program. The lockrta.cob program can be run by pressing the + key from the RTA main menu—call RTA if you need assistance.
- Module Mode: This setting affects whether the user can run the software in multi-threading mode, having multiple modules of the software open at the same time. Ex: Filling in a work order in one window, Referencing a purchase order in another window, running a report in a third window…all at the same time. If multi-threaded mode is desired, uncheck the checkbox for 'single module mode' and specify the maximum number of separate windowed modules that the user may have open at the same time. To avoid record locking issues, it is advisable to set this at the lowest number possible while still allowing the user to efficiently perform their job functions.
- View/Print: This option sets the default choice for the user when printing reports. If PRINT ONLY is selected, the report will be sent directly to Windows print manager to be printed. If PROMPT PRINT or PROMPT VIEW are selected, then the user will be asked each time whether they want to view or print the report and the default choice will be determined by this option. If VIEW ONLY is selected, then the report is automatically displayed on-screen. The user would then be able to print the report after viewing it.
- Vehicle Label: If this user works on special equipment instead of vehicles, this field can be set so that the terminology on menus, screens, and reports changes for this user. For example, if this employee is a radio technician who repairs radios and other electronics, you could set this field to 'Radio'. When this user logs in and accesses the main menu in RTA, Master > Vehicle > File Maintenance would become Master > Radio > File Maintenance. Instances of 'Vehicle' throughout the program would be replaced with 'Radio' instead.
- Access Rights: Menus, screens, fields, and programs can be secured. The access rights are grouped in the following categories: Vehicles, Work Orders, Parts, Purchase Orders, Fueling, Tires, Reports, System, and Miscellaneous. The Vehicle access rights are initially displayed on the screen. To view other access rights, select the desired category from the Access Rights menu or click on the corresponding icon in the toolbar.
Specify whether this user has access to the options shown. To allow access, select the checkbox; to prohibit access, deselect the checkbox. The Select All and De-Select All buttons may also be used to quickly select or deselect all the access rights shown on the screen. Keep in mind that if a template was used when creating this new user record, the access rights will be set identically to the template user record. If a template was not used, all access rights will be enabled.
The number that appears before the access right description corresponds to its position on the User Listing report (SUL). For example, the Add Vehicles access right shows 001 in front of it. This means it is printed in the first position on the User Listing. The Add Customers access right shows 117 in front; it is printed in the 117th position on the User Listing. This number is also used when changing an access right globally for all users. Refer to "Globally Setting an Access Right for All Users" in the following section.
User Record SMTP Email Settings
A user may desire to send reports or automated notifications via email. Users individual email accounts must be configured in order to use these features.
While editing a user, click EDIT > STMP INFORMATION on the menu.
- Enter in the appropriate email address, SMTP mail server hostname, server port, and whether authentication is required to send outbound emails from the server.
- Enter in the user's user name and password for their email account.
- If you do not know the settings to enter, you will need to consult your company's IT department for guidance.
Globally Setting an Access Right
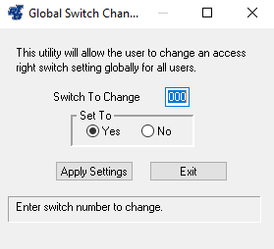
The Global Switch Change option quickly enables or disables an access right for all RTA users-eliminating the need to make the change individually in each user record. To globally set an access right for all users, do the following:
- Select System > Setup Users > File Maintenance from the RTA main menu (SUM).
- Enter password level 3.
- Enter a user name or press F1 to select a user from the lookup list. It doesn't matter which user record is selected since the change is made globally to all users.
- Select Access Rights > Global Switch Change from the menu or click on the Global Switch Change icon in the toolbar.
- Enter the access right number to set (located before the access right description).
- Set to YES to enable access; set to NO to disable access.
- Choose Apply Settings to complete the process.
User's Facility Access
A user is assigned to a default facility, but may also access records and run reports for other facilities. This access is granted by selecting each facility you want made available to the user.
- Select System > Setup Users > File Maintenance from the RTA main menu (SUM).
- Enter password level 3.
- Enter a user name or press F1 to select a user from the lookup list. It doesn't matter which user record is selected since the change is made globally to all users.
- Select Access Rights > Facility Access from the menu or click on the User Facilities icon in the toolbar.
- For each facility, specify whether the user will have full access, read only access, or be denied access by clicking the appropriate radio button.
- Click Exit to complete the process.
Changing User Password
A user may easily change their own password.
- Select System > Setup Users > Change Password from the RTA main menu (SUP).
- Enter your current user name and password.
- Enter your new desired password twice.
User Roles
User roles may be used to apply inherited security privileges to users instead of configuring rights individually for specific users. Roles also come into play in applying security privileges to employees who access modules such as Paperless Shop. In this case, there is no user login being entered at all, and multiple employees use their employee ID when navigating the module.
Setting up User Security Roles
- Add User records via the User Setup screen (SUM) that will be used as the "Roles" for other users. These will be named for groups of employees, such as MECHANIC, SUPERVISOR, PARTS CLERK, CLERICAL, DIRECTOR, etc.
- Add Employee Classes to RTA via the Employee Class tab in System Codes Maintenance by selecting System > Setup System Switches > System Codes (SSY) from the RTA main menu.
- Assign an employee class to individual employee records by selecting Master > Employee > File Maintenance (MMM) from the RTA main menu. Select from the applicable list of classes to populate the Class field.
Logging in through the Main RTA application
When a user logs in through the User Login screen, they will still enter their specific user login name and password. If this user has been assigned an employee number, the system will load that employee and see if the employee has been assigned to a class. If the employee has a class, the system will use that class name to load another user record (the role) and the access rights from this user role will override the initial user's individual access rights.
Example: A User Record called "MECHANIC" is created as the security role for all mechanics in System > Setup Users > File Maintenance (SUM). A User Record called "JOE" is assigned an employee number of "201" in System > Setup Users > File Maintenance (SUM). An Employee Record numbered "201" is assigned an employee class of "MECHANIC" in Master > Employee > File Maintenance (MMM).When JOE logs into RTA, his access-rights will be loaded from the user role "MECHANIC".
Logging in through Paperless Shop
When a mechanic logs in through the Paperless Shop Login screen, they will enter their employee number. If this employee has been assigned an employee class, the system will use that class name to load the user record. All security privileges and dashboard attached to this user will be used within Paperless Shop. If the employee class does not exist or is not specified, then privilieges from the user "SYSTEM" will be used.
Example: A User Record "MECHANIC" is the security role for all mechanics as defined in System > Setup Users > File Maintenance (SUM).A User Record "JOE" is assigned an employee number of "201" in System > Setup Users > File Maintenance (SUM). Employee number "201" is assigned an employee class of "MECHANIC" in Master > Employee > File Maintenance (MMM). When employee 201 logs into Paperless Shop, the security rights from user role MECHANIC will be applied.
Adding a Quick Launch Button
The quick launch menu allows users to quickly access and run RTA and non-RTA programs with a single click of a button. For example, a user who is responsible for part purchases can set up quick-launch buttons to bring up requisitions and purchase orders. This way, instead of having to click on Parts > Purchase Orders > Edit Requisitions and Parts > Purchase Orders > Create/Receive PO throughout the day, the user can simply click on the Edit Requisitions and the Purchase Orders buttons-two clicks instead of six!
Examples:
- Managers can add quick-launch buttons to access daily, monthly, or batch reports and other managerial options.
- Part clerks can add quick-launch buttons to access frequently used part options.
Two types of buttons can be set up: quick-launch and auto-run. Quick launch buttons are displayed on the RTA main menu, allowing users to access their most frequently used options with a single click. Auto-run buttons automatically run programs when the user initially logs into the RTA system for the day. A total of 50 buttons can be set up for each RTA user. 40 of the 50 buttons can be set up as quick-launch buttons. All the buttons, including those set up as quick-launch buttons, can also be set up as auto-run buttons. (See "Setting Programs to Auto-Run at RTA Start Up")
Refer to the instructions in the following section for setting up quick-launch and auto-run buttons. The process varies slightly depending on whether the buttons will access standard RTA programs, custom RTA programs, or non-RTA programs. Please note that only the first 14 quick-launch buttons are displayed on the RTA main menu, appearing in the order in which they were assigned.
Setting Up Buttons for Standard RTA Programs
Setting up quick-launch buttons to access RTA programs is a snap. Basically, all you need to do is select the items from a drop down list and RTA does the rest!
Administrator can set up buttons for a user:
- Select System > Setup Users > File Maintenance from the RTA main menu (SUM).
- Enter password level 3.
- Add a new user or bring up an existing user record.
- Select Access Rights > Button Menu from the menu or click on the Icons button icon in the toolbar.
- Click the Add Program button.
- Press F1 for a list of options and then choose the desired option by double-clicking on it or pressing the ENTER key. No other information is required. You should now see the item listed in the Buttons Assigned section. All buttons assigned are automatically set up as quick-launch buttons. The first 40 quick-launch buttons assigned will appear on the RTA main menu.
- Repeat step 5 until all desired buttons have been added.
- Check the "Use Navigator" box if user prefers Navigator as primary method of accessing features in the RTA software.
- Choose Exit when done to save the newly added items.
Users can set up buttons for themselves:
- Select System > Setup Users > Quick Launch Button Setup from the RTA main menu (SUQ).
- Enter the user's personal password. The user's current buttons will be displayed
- Click the Add Program button.
- Press F1 for a list of options and then choose the desired option by double-clicking on it or pressing the ENTER key. No other information is required. You should now see the item listed in the Buttons Assigned section. All buttons assigned are automatically set up as quick-launch buttons. The first 40 quick-launch buttons assigned will appear on the RTA main menu.
- Repeat step 4 until all desired buttons have been added.
- Check the "Use Navigator" box if user prefers Navigator as primary method of accessing features in the RTA software.
- Check the "Open Dashboard" box if user prefers their dashboard(s) to be displayed when they start the RTA application.
- Choose from the drop-down options to "Customize Toolbar". This determines whether both text and graphics are displayed for toolbar buttons (default), or whether only the graphics or text are displayed (this uses a bit less screen space).
- Choose Exit when done to save the newly added items.
NOTE: To also set the button up as an auto-run button, refer to "Setting Programs to Auto-Run at RTA Start Up."
Setting Up Buttons for Custom RTA Programs and Other Programs
RTA has made it convenient for you to access custom-written RTA programs as well as other applications you may want to use with the RTA system. To set up a button to access these types of programs, do the following:
- Select System > Setup Users > File Maintenance from the RTA main menu (SUM).
- Enter password level 3.
- Add a new user or bring up an existing user record.
- Select Access Rights > Button Menu from the menu or click on the Button Menus icon in the toolbar.
- Select Other from the Button to Add drop down list.
- In the Title box, enter up to 37 characters as the description for the button item. The description entered here displays in the help bubble when the mouse pointer is placed on the button.
- In the Program Name box, enter the RTA custom program name OR the command string to execute the non-RTA program. If the button calls a non-RTA program, be sure to include the path where the program is located. For example, to call up Excel, the command string may look something like this: "C:\Program Files\Microsoft Office\Office\EXCEL.EXE" If you are still unclear of what to enter here, contact your system administrator for further assistance.
- In the Bitmap box, leave this field blank to display a generic RTA logo button (litlerta.bmp) OR enter the name of the bitmap you would like to use (must be .bmp format). If you want to modify the existing bitmaps or make custom bitmaps, simply use your favorite draw program or Windows Paint.™ To display properly in the RTA menu, the bitmaps must not be larger than 85 x 65 pixels.
- In the Flag box, leave this field blank if setting the button up for a custom RTA program. If the button calls a non-RTA program, type $ in this field.
- Choose Add once all the information has been input. You should now see the item listed in the Buttons Assigned section. All buttons assigned are automatically set up as quick-launch buttons. The first 14 quick-launch buttons assigned will appear on the RTA main menu.
- Repeat steps 5 – 10 until all desired buttons have been added.
- Choose Exit when done to save the newly added items.
NOTE: To also set the button up as an auto-run button, refer to the next section.
Setting Programs to Auto-Run at RTA Start-Up
It's possible to set up programs to auto-run the first time a user logs into the RTA system for the day. If a user always brings up a certain program in RTA, why not set that program to auto-run so it automatically comes up in RTA? For example, a service writer can set the system up to auto-run a PM due report immediately upon log in OR a manager can auto-run cost reports along with an accounting application. The auto-run feature only occurs once per day, so if a user logs out and then logs back in, the auto-run programs do not execute again unless a date change has taken place. To set up an auto-run button, do the following:
- Set up buttons as needed (refer to previous instructions).
- In the Buttons Assigned section, double-click on the item you wish to auto-run at RTA start up. Another window will open.
 Select the Auto Run checkbox.
The Button checkbox is active by default, indicating this item is set up as a quick-launch button. The first 14 quick-launch buttons assigned will display on the RTA menu. Clear this checkbox if a quick-launch button for this program is not needed on the RTA main menu. As long as the Auto Run checkbox is selected, the program will auto-run the first time a user logs into RTA each day, regardless of whether or not a quick-launch button appears on the RTA menu.
- Choose Save to complete the process.
NOTE: When multiple programs are set to auto-run, the programs will execute one at a time, in the order in which they were assigned.
Changing a Button Menu
Changes can easily be made if you need to modify the order in which the quick-launch buttons are displayed or the order in which the auto-run programs are executed. You can also modify the message displayed in a help bubble and other button settings as well.
- Select System > Setup Users > File Maintenance from the RTA main menu (SUM).
- Enter password level 3.
- Enter a user ID or press F1 to select a user from the lookup list.
- Select Access Rights > Button Menu from the menu or click on the Button Menus icon in the toolbar.
- In the Buttons Assigned section, double-click on the item you wish to change.
- Make the changes as needed.
- Choose Save once all the changes have been made.
Deleting a Button Menu
- Select System > Setup Users > File Maintenance from the RTA main menu (SUM).
- Enter password level 3.
- Enter a user ID or press F1 to select a user from the lookup list.
- Select Access Rights > Button Menu from the menu or click on the Button Menus icon in the toolbar.
- In the Buttons Assigned section, double-click on the item you wish to delete.
- Choose Delete.
- Choose Yes to confirm the deletion.
Changing a User
To change a user record, do the following:
- Select System > Setup Users > File Maintenance from the RTA main menu (SUM).
- Enter password level 3.
- Enter a user name or press F1 to select a user from the lookup list.
- Make the changes as needed.
- Save the record. Note that if the user is logged in when changes are made, he/she must log out and back in before the changes take affect.
Deleting a User
To delete a user record, do the following:
- Select System > Setup Users > File Maintenance from the RTA main menu (SUM).
- Enter password level 3.
- Enter a user name or press F1 to select a user from the lookup list.
- Select File > Delete Record or click on the Delete Record icon in the toolbar.
- Choose Yes to confirm the deletion.