How to Add a Vehicle Class Code
How to Add a Vehicle Class Code
- Enoch Poston
Owned by Enoch Poston
Last updated: Feb 17, 2017
Vehicles can be grouped into classes for reporting purposes. Class Codes are used by the entire RTA system and are not Facility specific. Within each Class of vehicle, maximum units are used for odometer input validation. Additionally, description fields define what information is prompted for in the Class Info Tab of the Vehicle Master File. Also, checking the “List” box allows you to limit data input in the respective field.
Step by Step guide
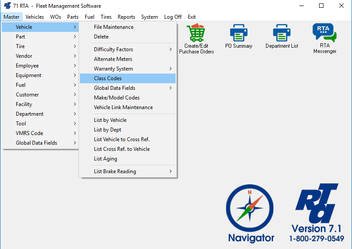
- Select Master > Vehicle > Class Codes (MVC) from the RTA main menu.
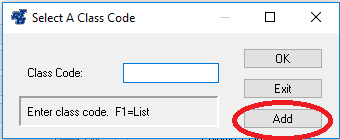
- Enter a class code and select “Add”. The class code is a text field allowing up to 15 characters.
- At the prompt, ”Use a template class code?”, select “No” if you wish to create a new Class Code from scratch. Select “Yes” if you wish to use an existing Class as a template for the one you are creating. ****Skip to step 5 if not using a template
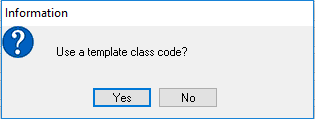
- If you are using an existing Class Code as a template, select the Existing Class radio button, and press the enter key to advance the cursor to the Template Class Code field. Key in the Class Code you wish to use as a template, or press “F1” to view the lookup list of Class Codes. Double-click on the appropriate Class from the list, and then select “OK”.
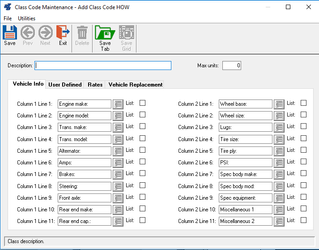
- Enter the Description, Max Units (a limit for odometer input validation), and edit the description labels for this specific class of vehicles. Doing so customizes mechanical field labels according to the Vehicle Class Code. For example, a Class Code of “BUS” will have different mechanical labels than a tractor, mower, trailer, pickup, and so forth. Check the List box to define the Descriptions for which you would like to restrict input; then create the list. If you do not wish to restrict input, simply leave the List box unchecked.
- Save the record.
, multiple selections available, Use left or right arrow keys to navigate selected items