/
How to Add a Customer
How to Add a Customer
- Enoch Poston
Owned by Enoch Poston
Last updated: Feb 17, 2017
Step by Step guide
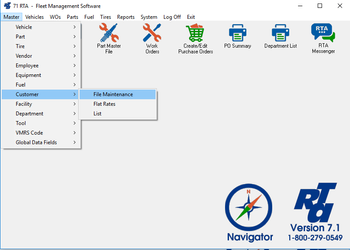
- Select Master > Customer > File Maintenance (MCM) from the RTA main menu.
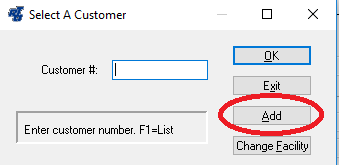
- Enter a customer number and select “Add”. The customer number is a text field allowing up to ten characters.
- Enter the customer information. (Yellow highlight indicates required fields however the more you fill in to RTA, the more you get out)
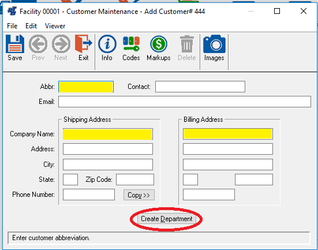
- Click the “Create Department” button located at the bottom of the screen (see Red Circle above) to create a matching department record for that customer. In many fleets, the customers ARE departments. This feature reduces data entry time in setting up the same record in both lists. A similar option is available to create a Customer from within the “Add Department” screen.
- Save the record.
Remember you can copy over the shipping address to the billing address by pushing the copy button.
, multiple selections available,
Related content
Customer Files
Customer Files
More like this
Adding a Vehicle
Adding a Vehicle
More like this
Creating a Purchase Order
Creating a Purchase Order
More like this
Create Work Orders
Create Work Orders
More like this
Migration of Customer's Existing Data to RTA Cloud Hosted SaaS
Migration of Customer's Existing Data to RTA Cloud Hosted SaaS
More like this
Creating a Motor Pool Reservation
Creating a Motor Pool Reservation
More like this