/
Quick Fuel Entries
Quick Fuel Entries
- Enoch Poston
Owned by Enoch Poston
Basic Info
Fuel transactions may be entered directly into RTA, entered into a handheld TriCoder and uploaded into RTA, or uploaded from an electronic fueling system using an Electronic Fuel Interface. Information on manual entry is provided below. For more information on using these options, contact RTA Tech Support.
Step by Step guide
- Select Fuel > Fuel Entry > Quick Fuel Entry (FFQ) from the RTA main menu.
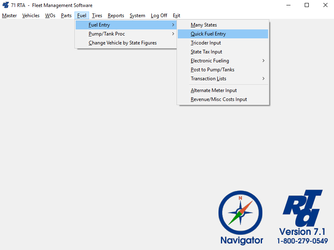
- At the prompt for Posting Method, the “Fuel and Miles” button will be selected by default. Select the “OK” button.

- The Quick Fuel Entry screen will be displayed. Use the Tab key to navigate through the data fields. The cursor will start in the “Vehicle” field. Enter the Vehicle number, or press “F1” for the lookup list. Enter the “Date” and “New Meter” reading for the fuel transaction. As you navigate from the “New Meter” field, RTA will calculate the miles travelled since the last fuel transaction for this vehicle and display the trip mileage in the “Miles” field, located just below the date. In the “Charge #” field, you can enter a reference to a fueling ticket (optional).
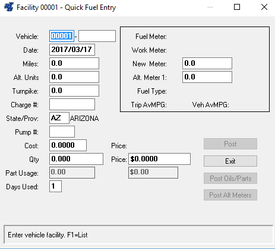
- As you continue to tab through the fields in the Quick Fuel Entry screen, you can enter the state abbreviation into the ”State/Prov” field (optional). If using your own pumps and tanks, enter the “Pump #” (the Price will automatically be pulled from your Tank Record). If not using your own pumps and tanks, enter the unit cost for fuel in the “Price” field. Enter the amount of fuel dispensed in the “Qty” field. The total fuel cost will be calculated and displayed. If you are tracking vehicle utilization, you can enter the number of days the vehicle was used since last fueled in the “Days Used” field. If you are using “Alternate Meters” for this vehicle, select the “Post Alt Meters” button to update the “Alternate Meters”. When finished, select the “Post” button.
, multiple selections available,
Related content
Fuel Ticket Entry
Fuel Ticket Entry
More like this
Fuel Entry
Fuel Entry
More like this
Processing Fuel Transactions
Processing Fuel Transactions
More like this
Review Fuel Transactions
Review Fuel Transactions
More like this
Fuel Types
Fuel Types
More like this
Tracking Fuel Inventory in RTA
Tracking Fuel Inventory in RTA
More like this